Backstage Pass to North Dakota History

This blog takes you behind the scenes of the State Historical Society of North Dakota. Get a glimpse at a day-in-the-life of the staff, volunteers, and partners who make it all possible. Discover what it takes to preserve North Dakota's natural and cultural history.

Teaching about Tipi Technology

Just take a walk through any of our galleries at the ND Heritage Center & State Museum, and you will notice countless connections between history and science. Highlighting these connections is one of my favorite parts of working at the State Historical Society. The most recent example I have been thinking about is the tipi.

The tipi is an example of Native American science and engineering ingenuity at work. These cone-shaped homes are well designed for life on the open prairie. The main structure consists of three (a tripod) or four lodgepole pines lashed together with a sinew rope. The tripod is usually set up with one pole on the southeast to frame part of the door, while the other two poles are on the north and south sides respectively. After the tripod is situated, the rest of the poles are added in order so they lock each other in place. A tipi might have as many as eighteen or more poles to complete the structure. The door is usually located on the east side.

table-top tipi model

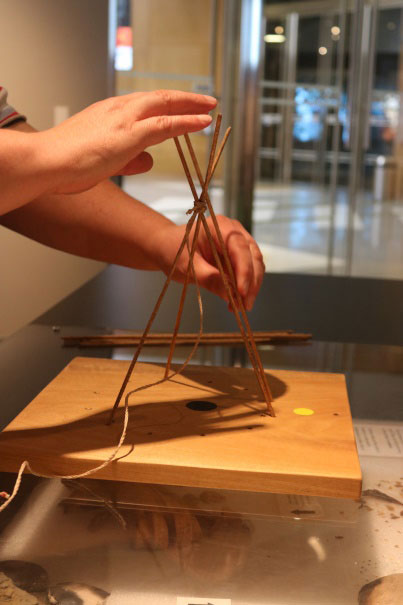
Outreach Coordinator Danielle Stuckle sets up a table-top tipi model during a public program.

A tipi cover is made from either several buffalo hides sewn together or from a canvas. The tipi base isn’t a true circle, but is actually more of an oblong, egg-shape. This allows for the fire to remain directly under the smoke hole, yet moves it to the front of the tipi so there is more room for people to sit around the rear of the dwelling. This cone-shaped tipi on an oblong base is aerodynamic. As the wind moves over the structure, it pushes it into the ground and helps stabilize it. There is a slight tilt to the cone to enhance this effect. A tipi is brilliantly designed to stand up to the strong prevailing winds of the Great Plains.

Canvas from table-top tipi model

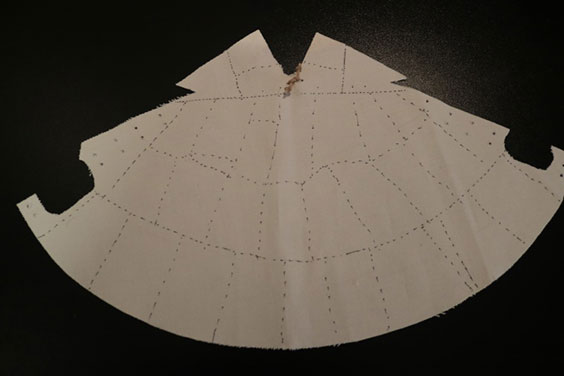
This canvas from the table-top tipi model shows how several buffalo hides are sewn together to make a tipi cover.

A tipi is lined throughout with an ozan, or dew cloth, made out of hide, canvas, or blankets. This liner only goes up about six feet from the ground. There is a gap between the liner and the cover, which creates a chimney effect. This produces a convection current that circulates air in the tipi and pulls smoke out through the opening at the top. The flaps around the smoke hole can be adjusted as the wind changes direction; much like the flue of the chimney can be adjusted. This helps draw the smoke out so that a fire can be used inside for cooking and for warmth. The dead air between the liner and the cover also helps to insulate the tipi and keep it warmer in the winter. Wood pegs are added to the tipi poles to help guide water down the pole, between the cover and the liner. The cohesive effect of water keeps rain water running down this path all the way to the ground and right out of the tipi. If rainfall is really heavy, a gutter or shallow moat can be dug around the tipi, ensuring the inside stays nice and dry.

Scale model tipi

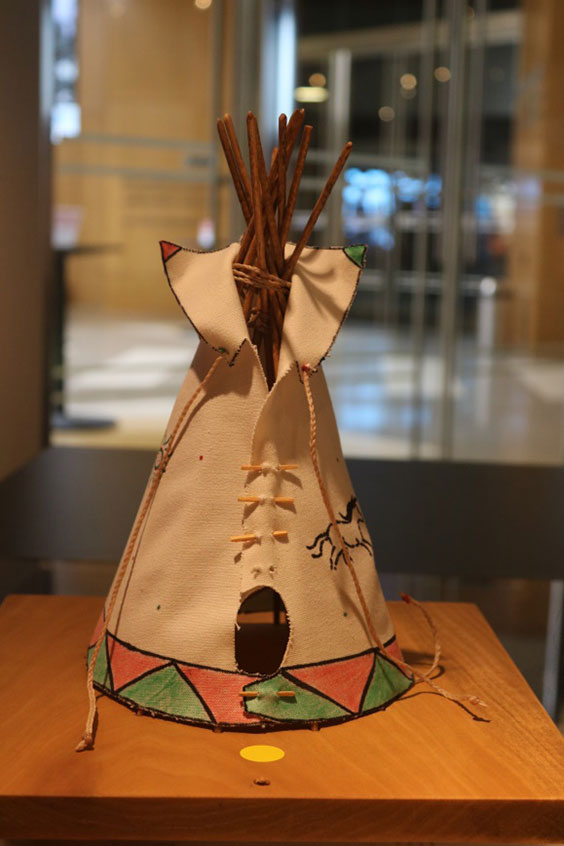
This scale model of a tipi is used in education programs at the State Historical Society of North Dakota.

A tipi is a well-designed structure, built out of locally available materials, to withstand the unique conditions of the Great Plains. We might not initially think of technological innovations in the distant past as science, though Native Americans used observations and experimentation to build knowledge about corn breeding, animal behavior, weather patterns, geology, and countless other aspects of the natural world. When it came to engineering their homes, Native Americans observed what works in this environment and experimented with different methods to build a better house. Certainly a practical and scientific approach we can appreciate.

Spinning History into Gold

My favorite type of museum program to give is a demonstration. Over the years, I have learned to do all kinds of different crafts and activities in order to show the general public how people of the past did their work. Demonstrations are a great way to pull people in and get them excited about history. You can have a relaxed and informal discussion about how people at a particular site, or in a particular time period, lived. How is butter made, and what is the science behind it? How do you make a quilt and piece together a complicated pattern? Embroidery; wood carving; leather stamping; making rope, soap, and candles? I can do some of these projects better than others. Over the years I’ve picked up things here and there, learned from mentors, learned from friends, and learned from colleagues at living history sites. One of my favorite resources is YouTube video tutorials.

Drop spindle and wool roving

The author's drop spindle and wool roving

The newest thing I’m learning to do is spin wool to yarn by using a drop spindle. We have several talented staff here who know a lot about spinning, and they have been very nice to share some of their knowledge and expertise with me. This is very exciting to me as a museum educator. I am planning some programs to demonstrate how we go from sheep to mitten, and all the steps in between. This provides us with endless opportunities to interact with our visitors and teach them long forgotten skills that were once more commonly part of everyday life. After we have the yarn we can weave it, knit it, or crochet it—turning it into functional art like blankets, sweaters, and holiday ornaments. As our staff brainstorms all the different types of programs we can start doing, it is easy for us to get carried away. However, it is really fun to talk about everything from shearing a sheep; cleaning, carding, and dyeing wool; spinning it into yarn; and figuring out which of those programs would work best in our available space.

Drop spindle demo

The author demonstrating how to use a drop spindle.

I enjoy this process of learning how to do a new activity, and working at it until I can talk to other people about what I’m doing. Earlier this spring I sat in the Inspiration Gallery for about an hour practicing with a drop spindle. I am by no means an expert. In fact, I’m really not very good yet. However, I probably talked to about forty school children and several adults about what a drop spindle is; how it works; how it is related to a spinning wheel; and why people did (and still do) this kind of work. There are so many places to go to learn how to do projects like this. There are many books available about using drop spindles and spinning wheels. The internet is full of detailed video tutorials. This is probably my favorite part of working in a museum—learning how to do new things and showing other people what I’ve learned.

Spinning wheel

Spinning wheel on display at the North Dakota Heritage Center and State Museum

Teaching People to See: How to Use Photographs as Teaching Tools

“The camera is an instrument that teaches people how to see without a camera.”
—Dorothea Lange

Photographs are one of my favorite tools to use as a museum educator. One technique I like to use, known as a Visual Thinking Strategy (VTS), is a very simple and effective way for people to start to see more in an image than they otherwise would have noticed. There are three main steps to follow:

  1. Show an image to your audience—either project it on a screen in front of a classroom, or pass it around so everyone can get a good look at the details.
  2. Ask students to sit silently and look closely at the image for a minute or two.
  3. Guide the students through a series of questions that help them think critically about the image and start asking questions of their own.

We might start with an image like this one:

Tintype Portrait

Tintype portrait of unidentified group of African American women. SHSND 10737-310.

After taking in all the details for a couple of minutes, I would first ask my audience to tell me what is going on in the photograph. It is important that we don’t tell them what we want them to know. We have to be patient and let them make observations; compare and contrast their own answers; and start asking questions. We can keep the conversation going by asking follow up questions—“What makes you say that?” and “What more can we find?” This will help students continue their observations and will help them associate details in the image with their own personal experiences or prior knowledge.

This is a great activity for teachers of any discipline. English teachers can use this activity to initiate a creative writing activity. Science teachers can use this to connect observations of an image to classroom lessons such as identifying physical properties of an object. Math teachers can use images this way to help make connections for students between the real world and abstract concepts—for example, you could ask younger students to find basic shapes or to add or subtract the number of items in an image.

This exercise is great for someone teaching North Dakota Studies or other history classes. We can talk about the clothing and interior décor styles of past decades. We can talk about how a historian or archivist could do some detective work to try to find out more about who these unidentified women are. We could even talk about the preservation of historic images, and the process used to create a tintype.

Using a strategy like VTS gets people to start noticing details and interpreting what is going on in an image. Students begin to understand how other people might have a completely different understanding of what is going on in an image than they did. I always try to pair appropriate images to any lesson I’m teaching so that students start to exercise their history detective muscles. It can spark an interest in students of all ages.

Take Two and Call Me in the Morning

I am often called upon with strange and unusual questions. How do I make a mannequin look less scary? What is the white powder covering the taxidermied elk? How do I get a raccoon out from under a historic house? These are all actual museum problems; however, it is generally easier to deal with the mannequin than the raccoon. So how is it that I get so many odd phone calls?

Raccoon

Who would evict this cute little guy?

My job here at the State Historical Society of North Dakota is to provide outreach services. I work with museums throughout the state to identify professional training opportunities. I can work with individuals one-on-one, or hold a workshop or training seminar for a group of people. I also help museums in our region stay on top of industry trends, standards, and best practices. I field questions about the basics of running a museum, and I work with museums to analyze their basic health and diagnose underlying problems. Essentially, if you compare what I do to the medical field, I’m a general practitioner. I know a little bit about a lot of things.

Ask More Questions sign

In North Dakota, a lot of museums are staffed by dedicated volunteers with little professional training. My job is to help these museum laypeople access the same resources the experienced professionals know about. They call me for a general diagnosis of a problem they are having, and just like a doctor, I help them assess their overall health and analyze some potential problems. It often happens though, that a museum has a unique issue that needs further consultation. In cases like this, I recommend them to a specialist who works with that specific issue more than I do. Just like a doctor will recommend that someone with diabetes see an endocrinologist, I will recommend a consultation with an architectural historian to learn more about appropriate roofing materials for a historic house. While a doctor might have someone with headaches see a neurologist, I will direct someone with questions about digitizing a photo collection to an archivist. A doctor might recommend a pediatrician to a new mom, and I will recommend someone call a professional conservator to help stabilize the historic textiles in their collection. You get the picture.

Plastic Head

Museum work is really nothing like neurology.

On a national level the museum community is relatively small compared to other industries, and specialists are often surprisingly accessible if you know who they are and what they do. My office serves as a sort of clearing house, providing access to the wider range of museum field services. There are professionals all over the country who are available to North Dakota museums through the existing networks of professionals, specialists, and other consultants. While I can’t answer every question that comes my way, I usually have an idea of who we can call for more help. I don’t have an answer for every question. I still don’t know why Eleven likes waffles so much, or who Jon Snow’s father is, but trust me—I’m diligently working on the answers.

We Shall not Sleep, Though Poppies Grow

Two of the things museum and history professionals think about are what kinds of events from our collective past to recognize and commemorate, and how those can be accomplished in meaningful ways. It is our job as history professionals to sift through the immense amount of newspapers, diaries, photographs, artifacts, and other research materials, hoping to tease out the relevant stories that help contemporary people connect with all of the people who came before us. We will try to meet one of those challenges head-on as we look for ways to commemorate the 100th anniversary of the United States joining the efforts of European allies, including the British Empire and France, in World War I.

When the United States officially joined the war effort on April 6, 1917, European powers had already been embroiled in the war for nearly three years. By November 1918, as a tenuous peace was being reached, millions of soldiers and civilians had died in the war. Early in the conflict people were already struggling to understand the unprecedented loss of life. In 1915, a Canadian military doctor, Major John McCrae, penned the famous poem “In Flanders Fields.”[1] The common cornfield poppy mentioned in the poem, Papaver rhoeas (not to be confused with the opium poppy, Papaver somniferum), grows so well it is considered a weed in many places. The familiar annual, with four red petals surrounding a black base, remains a striking symbol and continues to grow abundantly all over the Flanders Fields battlefield and cemetery memorials.

Soldier in field of poppies

A soldier stands in a field of poppies in French Morocco. SHSND 2013-P-030-304.

Poppies have become well known in many countries, including the United States, for honoring the servicemen killed during and after World War I. The visual of the red poppy mentioned in McCrae’s poem resonated with an American teacher, Moina Michael, and inspired her to also promote using the flower as a symbol of remembrance. The Veterans of Foreign Wars and American Legion Auxiliary both began distributing poppies in the 1920s. Both organizations continue to this day to give complimentary crepe paper poppies made by disabled veterans in exchange for donations.

Governor Shafer buying first poppy

Governor George Shafer buying the first poppy from Ms. Henry Hanson, May 25, 1929. SHSND 10041-17.

Poppies remain an integral part of numerous commemoration events, programs, and exhibits occurring throughout Great Britain as remembrance efforts get underway there. The State Historical Society of North Dakota is also looking for creative and meaningful ways to use poppies as part of commemoration events in North Dakota. An easy and affordable way for communities and individuals all over the state to participate in this commemoration would be to plant poppies in community gardens. Several varieties of poppies are easy to grow throughout North Dakota, from the traditional cornfield poppy of Flanders Fields to the showier oriental poppy. Contact your local garden club to ask what plans they might have to plant poppy gardens in the next couple of years to commemorate this significant world-changing event.


[1] John McCrae, “In Flanders Fields,” The Great War: 1914-1918, accessed July 5, 2016, http://www.greatwar.co.uk/poems/john-mccrae-in-flanders-fields.htm.

Are You Ready for the Zombie Apocalypse?

It may seem odd to think about a pending zombie apocalypse from a museum educator’s perspective, but it can be a fun and useful exercise for a variety of purposes. We can use the cheeky pop culture trend to make some otherwise dry topics (such as disaster and emergency management planning) a little more fun and lively. Medical health professionals, like those at the Centers for Disease Control, use a hypothetical zombie apocalypse to model infectious disease outbreaks. The Pentagon has also used a fictional zombie apocalypse scenario as a planning and training tool. This has allowed the U.S. government to use zombies as a theoretical risk to plan defense strategies without offending any actual, real-life friends or foes that might take even a pretend elimination personally.

Zombie Poster

This poster from the Centers for Disease Control promotes a tongue-in-cheek awareness for zombie apocalypse preparation.
CDC - Office of Public Health Preparedness and Response. Preparedness 101 - Zombie Posters. http://www.cdc.gov/phpr/zombies.htm. March 2016.

How do we take these great ideas and turn them into our own living history zombie survival boot camp? One example can be our approach to water. Most survival books and websites recommend stocking up on a minimum of a gallon of drinking water per person per day. Just like the old proverb about teaching a man to fish, teaching people to find, filter, and purify their own water will help them survive longer than storing water alone. The State Historical Society of North Dakota has a SEND trunk available specifically about water resources. I have written about the SEND program before here and here. Another program I'll be teaching this spring will be one of the new Museum Lab classes for school-aged children. One class in March will focus on teaching kids how to make a water filter action system out of various materials. If it goes over well, there may be more sessions offered this fall. We can use programs like SEND and Museum Lab to teach both history and survival skills through museum programs.

Since humans can only survive for three to five days without water, it has always been critical for people to be able to find this resource. Throughout time people have learned how to watch for clues that will lead them to water, such as watching for the direction birds fly or places insects swarm. Humans learned how to follow animal trails to good sources of drinking water. We have learned to find vegetation that is high in water content and have learned how to collect and store water. People have even figured out how to find water underground and how to remove salt from ocean water. We also had to learn how to filter and purify water to remove the sediment and bacteria that can make us sick, or even kill us. Water is a resource that we have learned to manage to keep it clean and make sure there is enough for everybody. As we read about water availability and quality in other parts of the country, the relevance to our daily lives becomes obvious. What a great way to connect kids to both science and history in one fun topic.