Backstage Pass to North Dakota History

This blog takes you behind the scenes of the State Historical Society of North Dakota. Get a glimpse at a day-in-the-life of the staff, volunteers, and partners who make it all possible. Discover what it takes to preserve North Dakota's natural and cultural history.

Writing for Dakota Datebook
Dakota Datebook logoIf you are a fan of Prairie Public Radio here in North Dakota, you may already be familiar with the “Dakota Datebook” program. It airs five times a day, every day, and features snippets of North Dakota history that relate to that date in time. The posts pop up all over—sometimes reprinted in newspapers—and last year, a selection of dates were published in book form!

The State Historical Society of North Dakota has been a longtime partner in this program. A handful of past Archives interns have written specifically for this program during their time with us (such as Jayme Job, Tessa Sandstrom, Annie Erling, Maria Witham, Carol Wilson, and Alyssa Boge). Some of our staff serve as part of the editorial board. Also, a few of us write for the program—and as a result, we have ended up helping with a few different series that have formed.

Avid listeners to the series will likely remember these series. While there have been a few more, unconnected to the State Historical Society (such as Steve Stark’s series on Theodore Roosevelt from this past summer), a good number have been written by staff here:

  • One series, mainly written by Jim Davis, (though I assisted on one or two dates), was written for the 50th National Historic Preservation Act. Staff in our Archaeology and Historic Preservation Division provided some ideas for those datebooks.
  • Jim Davis also took the lead on and wrote a MASSIVE number of entries documenting and commemorating the anniversary of World War I, as well as a “Countdown to Statehood” series for the 125th anniversary of North Dakota’s statehood.
  • And now, I am writing my first series celebrating the 100th anniversary of the passage of the 19th Amendment—a series on women’s suffrage! And what better time to discuss this series than now, during National Women’s History month?

Now, I wouldn’t say I’m an expert on women’s suffrage, but writing for the series means you do a lot of research that takes you off in many different directions, and you learn a LOT of details—and get very familiar with it. In fact, I think you kind of start to LIVE the history. And the history is fascinating! Suffrage bills were present in many legislative sessions. However, not all men or women supported the idea. Prior to obtaining suffrage fully through the 19th Amendment, women did get some limited voting rights in North Dakota. Gov. Lynn Frazier alone would sign several bills related to women’s right to vote, including the ratification in December 1919. And despite all of this, women also still served in elected public offices, many quite early on. Such as Laura Eisenhuth—she was the first woman elected to state-wide office in North Dakota and the first woman to hold a state superintendent’s position in the United States in the 1890s.

The resources are out there, and it’s been a treat to find them and bring them together. I’ve read through old House and Senate journals when women’s suffrage had been on the agenda. I’ve been following threads concerning suffrage through different newspapers. (Thank you, Chronicling America!) I’ve been looking at posters and illustrations depicting the fight for suffrage—both here, and through the National Archives collections. These have been invaluable resources during my first few entries.

I’m also lucky to have a timeline I can follow, which the North Dakota Women’s Suffrage Centennial Commission put together, that gives me some direction if I am failing. Though I always have enjoyed writing about obscure details, the whole history helps to ground these stories and is also necessary for the series.

And then, to add icing to the cake, I am reading these entries for the program. Since these stories are about women, Prairie Public wanted to use a woman’s voice for the entries. I have never recorded something for radio before, so I am honored every time that I am able to bring a voice to these words.

This is a really fun, very different, and interesting part of my job, and I look forward to continue working on this project through this partnership.
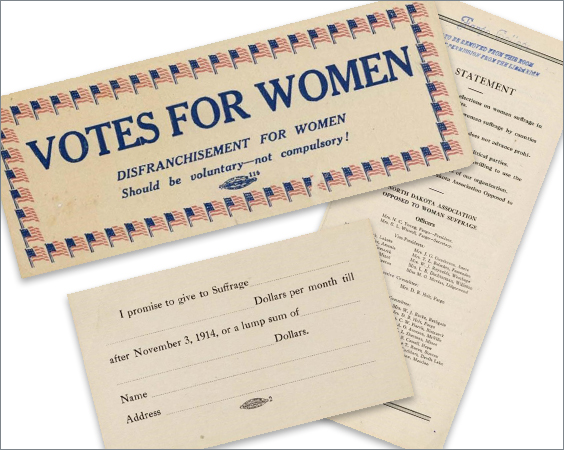
Collage of artifacts

These items, from our ephemera collection, show items for and against suffrage. Note that the North Dakota Association Opposed to Woman Suffrage consists of all women officers. SHSND SA 11354-Womens_Suffrage
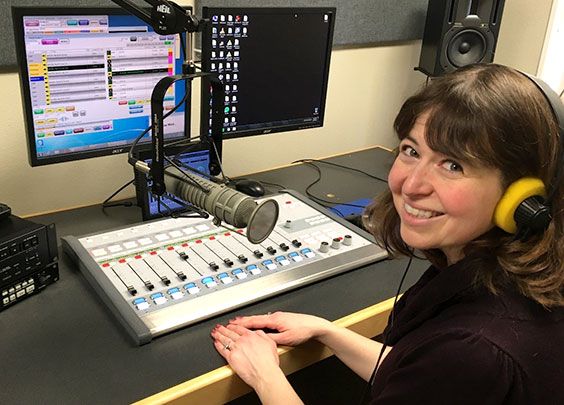
Sarah Walker at a computer and with radio equipment

Sarah Walker at Prairie Public Station in Bismarck, ready to record. The audio is actually recorded long-distance in Fargo, where it is edited and made ready to air.
Working with Young Patrons in the State Archives

I love working in the Archives — but I know that our collections don’t appeal to children and young adults in the traditional way. We don’t have exhibits or spaces made for participation like in our attached State Museum. We are interactive, yes — but we have a research factor that is necessary to discover the gems in our holdings.

So when the younger age demographic wanders into the Archives, it does not surprise me to see them turn and walk back out. Consisting mainly of unique papers and photos, digital files, and books, the Archives aren’t cut out for a clientele of babies or toddlers.

However, we do interact with older children, and lately the number of our younger researchers has increased. Sometimes they wander in with parents doing research. Sometimes they are brought in to listen to an oral history or to assist an older family member with computer use. Sometimes, they are here for an event — like Future Farmers of America, or National History Day — and they find us while waiting to present or participate. Sometimes, they still turn and run, but they also occasionally get interested in what we are and what we have. It’s really exciting to watch this happen.

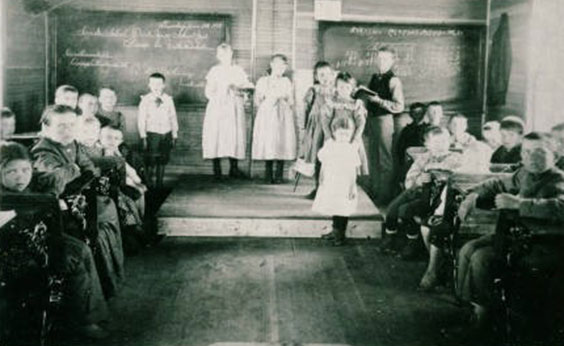
black and white photo of a classroom with students

This image shows a classroom from Pierce County, approximately 1898. Times have changed! SHSND 10844-00108

Many of our younger patrons come during classroom visits. They get a behind-the-scenes tour, learn how to use our resources, and learn how to do research in specific collections. We’ve provided quite a few of these opportunities for high school groups — but also for their younger compatriots. This is so much fun, but so different in how we approach our discussion. Typically, our first approach is to explain what an Archives is and what its purpose is. What do we collect? What don’t we collect? How are we similar to and different from the museum collections?

I’ve given many memorable tours to and helped provide research for younger patrons. One year, I provided a behind-the-scenes tour to a mixed-age group from a one-room school in the western portion of the state. Their ages ranged from about 7 to 12. I had a group of middle school boys who job-shadowed several of us in the Archives. I’ve had various tours with groups of high schoolers — including a group that came in and got a taste of research in the Reading Room, led by one of my own past high school teachers!

Sometimes I show them how to use microfilm and help them learn how to look up big news events (World Wars I and II, September 11, the 1966 blizzard), or help them to look up something of personal importance, such as their own birth announcement or a family marriage announcement.

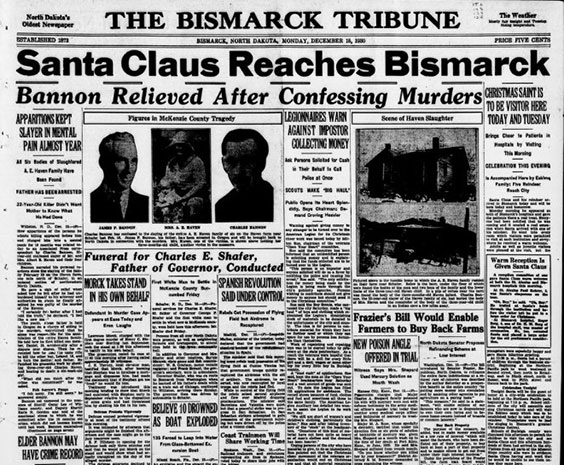
Bismarck Tribune clipping

Seeing something such as this headline from 1930 would certainly be of interest to kids who wonder what Christmas was like when their grandparents were little.

Sometimes I help them get set up with viewing photo images in our Reading Room. Searching by topic is of great interest to them, and they respond positively to viewing a unique, captured moment of the past.

A little more than a year ago, we had multiple groups of fourth graders come to the State Historical Society to do research for school. We met about five times with various teachers and students. They got a tour of the Reading Room and learned how to look up our collections. Then we provided them with some collections that the teachers had requested ahead of time, as well as some general information files we had on various topics of interest that they were researching. They looked at photo collections, manuscript collections, general information files, books, and newspaper clippings on microfilm and online, all related to different topics — including steamboats, the city of Bismarck, and railroads. They selected and photographed or copied items that informed them about this history, which they shared with their class and used for their projects. At the same time, they worked with our Archaeology & Historic Preservation division and visited a local state historic site. While not all of the kids went to all of the locations of interest, they worked jointly on a project that all of the research went toward. It was great to see the kids get into their topics of study. They were so excited about what they found — it did an archivist’s heart good!

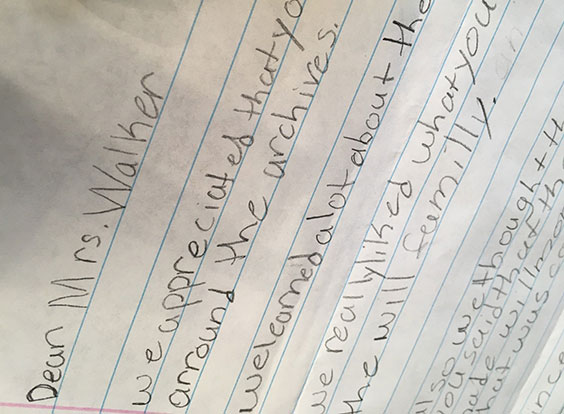
handwritten thank you note on lined paper

A thank you note I was sent after one of our job shadowing experiences. I have it hanging up in my office!

These kids and young adults will grow up to become our future patrons, and it is important that they know where to go for research, and what is available to them. In fact, it may help them in their school work — and it may help them with many other tasks.

We love to see the variation in our researchers and believe strongly in educating future researchers as to the importance of all of our history. If you would like to discuss scheduling a class trip or options for bringing youth to the State Archives, please contact us!

Naturalization Record Access at the State Archives

Every day is a little different when it comes to work in the North Dakota State Archives. We might get requests on how to access marriage records, newspapers, manuscript collections, or state series. Someone may wish to find a publication from 1940, or a photo of their grandparents. We may or may not have these items, but we will see what we do have to help a researcher out!

Within these requests, however, there are some constants. One of these is the request for naturalization records.

The State Archives has early naturalization records, or citizenship papers, from pre-statehood up to around the 1950s. This covers a very important era in the state. These papers were important for immigrants who came to the area because they demonstrated their intention to become a citizen of the United States—something that they had to do in order to try to homestead a claim.

Naturalization records typically consist of two sets of papers, filed successively within a few years. Laws changed frequently, which could be confusing, so occasionally people thought they had fulfilled their responsibilities but had only filed one set of papers. Minors only had to file once. Women and children were typically naturalized under their husbands or fathers, so they did not file on their own with any kind of frequency until years later. Also, some were naturalized with just one set of papers around the time of statehood, and were thus grandfathered into citizenship.

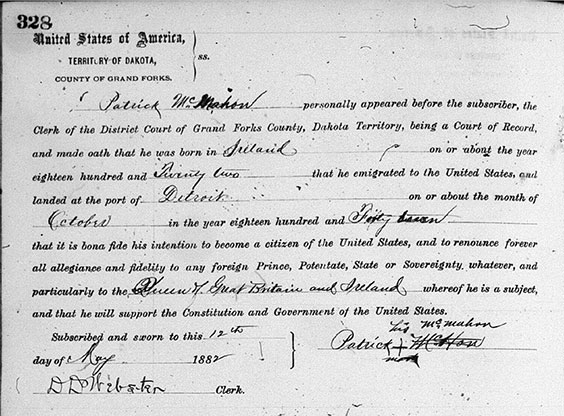
an early naturalization record

Example of an early naturalization record. The page number is 328, listed at the top left. Below is another similar naturalization record. Some records have more information than others.

Every county is represented in our collection, and we receive requests for documents from this collection almost daily. There is a good index listing here, so you can look for the record of your family member, but you won’t be able to actually access it via the website here.

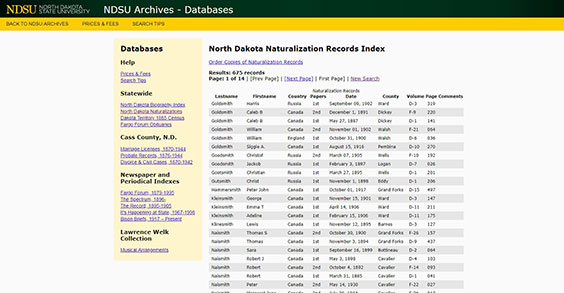
Type in the individual’s information, and you will see a list of names:

NDSU North Dakota Naturalization Records Index webpage

To look up the information, we need the name, county, volume, and page number.

Underlined parts of the naturalization record that one needs to know before looking them up

After that, there are three ways that researchers can access local naturalization records.

  1. Come to the ND State Archives during our open hours, 8 a.m.-4:30 p.m., Monday through Friday, or 10 a.m.-4:30 p.m. every second Saturday. (We are closed on state holidays.) We will help you look up the records, which we have on microfilm.
  2. Send in a research request! We charge $5 per name, and we will send what we have for first or second papers. If both sets were completed and are in our collection, we will send them both under that fee.
  3. Look for them at familysearch.org.

If there are any questions, reach out to us! Contact us at archives@nd.gov. We are more than happy to help!

Photos Part 2: Ordering and Using Photos from the Archives

Last week, I published a post on how to conduct photo orders in the State Archives (if you missed it, find it again here). I promised I would follow up with a second post on how to use this information to place a photo order, how these images can be used, what we do and do not allow, and more.

So, here we go again!

As you learned in my previous post, quite a few photos can be viewed and accessed on our website. We are happy that these items can be used and viewed in this way, as it does help people researching images. But, how do you actually get the image? And what are you able to do with it once you have it?

Ordering Images

Images provided by us are part of our collections, and if we need to provide a copy, we do charge a fee.

At this time, you may order one of four types of images.

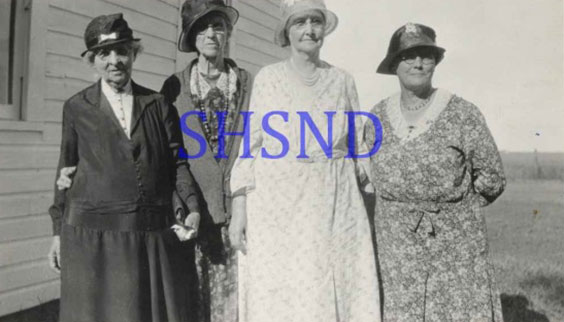
Old picture of four ladies in dresses and hats

1. A watermarked thumbnail for reference, which is typically scanned at the lowest resolution with the agency name stamped across it. This is for reference to show you what is in an image that heretofore has not been scanned or posted on Digital Horizons. We do not charge for this service. (The watermarked image shown here is SHSND 10468-00357).
2. A paper print, which is typically black and white ink on white paper. For a paper printout, the clarity of the image is pretty good, but this is printed on regular printer paper, and again is just intended for research purposes. The fee is $1 per image.

Picture of President George H.W. Bush and another man holding papers

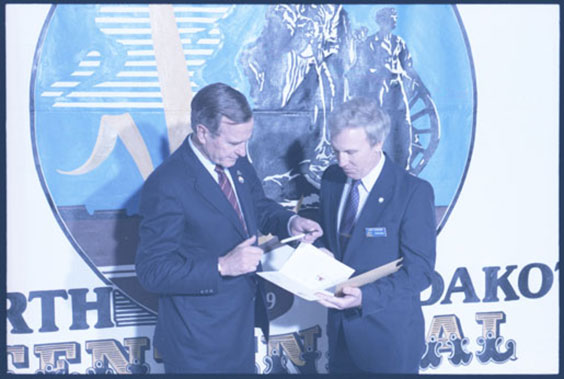
3. A low resolution scan of the print or negative, such as the image shown here of President George H.W. Bush in Bismarck during the Centennial Celebration in 1989, SHSND 31843-016-00002. (The images used in our blog posts are all low resolution.) This is typically provided in a jpg format and is sized around 200 dpi or less. This indicates that you may see less specific detail, and enlarging the image makes it more pixelated. This image can probably still be sent to you in your email as an attachment without filling your inbox—kind of similar to most normal or lower resolution photos you might take on a smart phone. The fee is $8. If it suits your needs, you can download images from Digital Horizons. They are about the size of a typical low res scan, and we do not charge you for this service.

Photo of Brave Buffalo wearing headdress and vest.

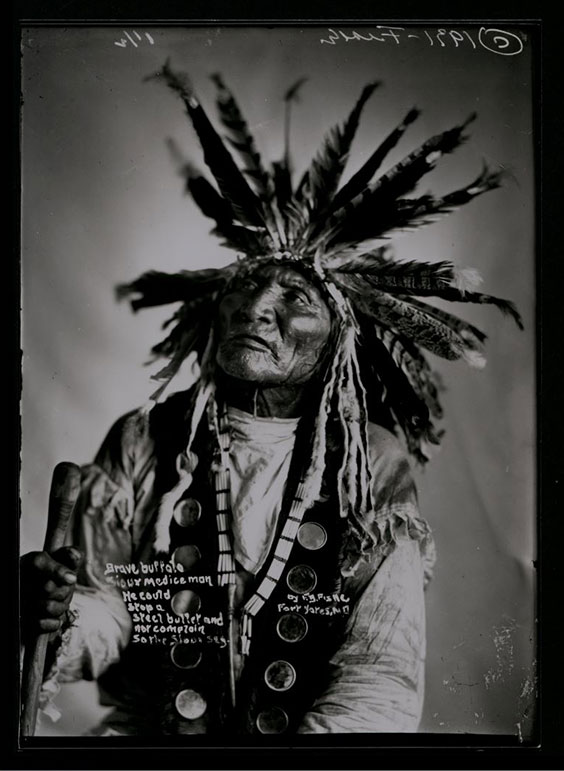
4. A high resolution scan of the print or negative. This image is probably too large to send to you as an attachment, and will likely need to be sent to you via our share site or on a disc. These comprise the majority of the photo orders we fill. They are typically sized around 600 dpi. These images are crisper, clearer, can be enlarged easier, and are considered suitable to print. Though we are capable of scanning items at a higher setting, this is typically the standard. (You can see this in this detail from photo SHSND 1952-05018, a photo by Frank Fiske of Brave Buffalo. The details of his face are still very clear and crisp. A high resolution scan fee is $20 per image.

If you want to order an image, come to the Archives in person or email or call us with the photo information. We may ask you to fill out our order form, available here on our website. Often, an email with the photo number is plenty.

The photo number consists of a collection number and item number (although letters are occasionally part of the name). They sometimes are longer and shorter, depending on what they are a part of. However, they typically look like one of these examples:

1952-00001 → 1952 is the collection, and this is the first item in that collection.

2005-P-001-00001 → 2005-P-001 is the collection, and this refers to the first item in that collection.

A0002-00001 → A is the collection; there are a series of linked images in this collection so while there may be several item numbers under this second item in the A collection, this is the first image.

10958-31B-25-00001 → This is the first photo in folder 25 of Box 31B from manuscript collection 10958 (William Shemorry). Not all manuscript numbers are as long as this one, which does differ slightly in its numbering. Most will look like a typical photo collection number and item number.

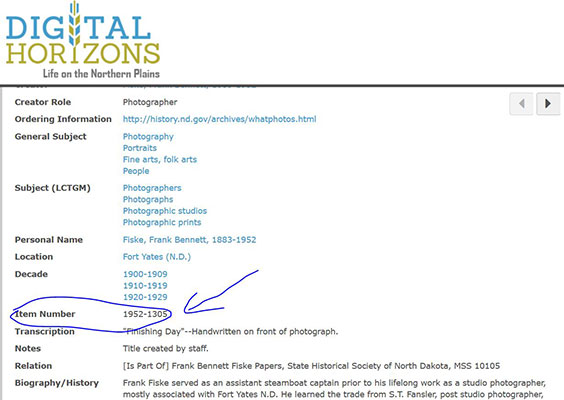
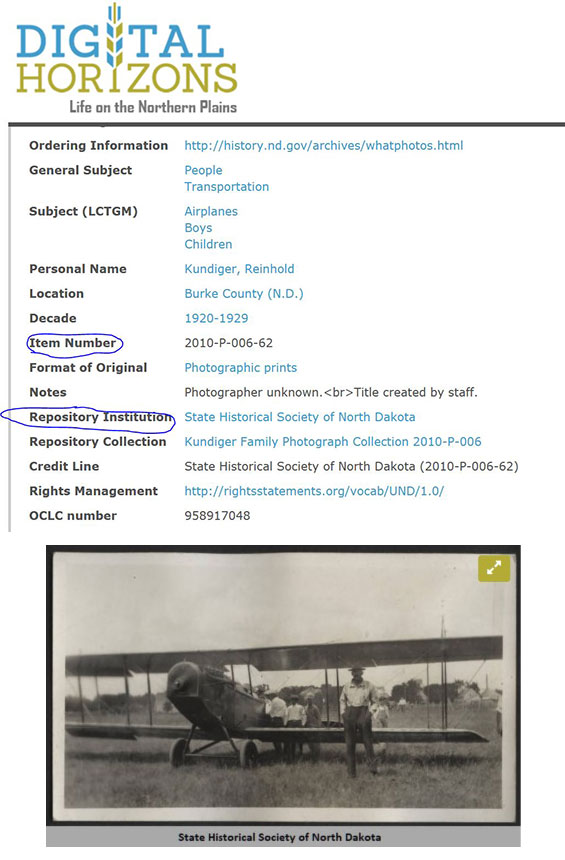
Find the photo number on Digital Horizons by scrolling down the page and selecting the item number (circled).

Screenshot of Digital Horizons website with the Item Number circled

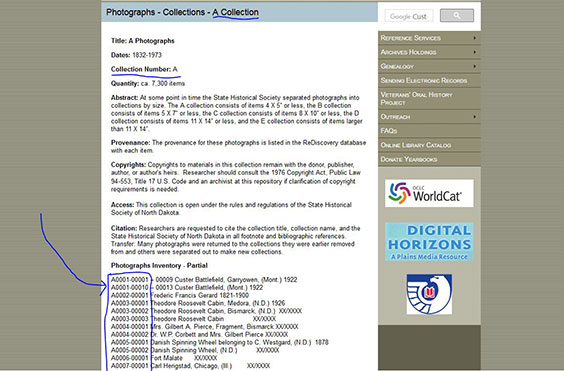
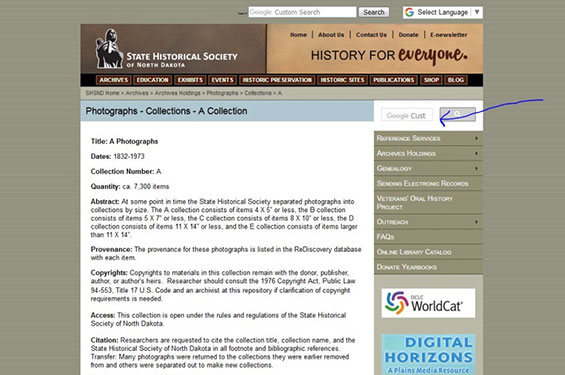
If you want to order an image that is not on Digital Horizons, you’ll need the photo number on our website. If the image itself is posted, this number will be found near or underneath it on our webpage or even on our Facebook posts. The photo numbers are also listed out under the photo collections, where you will see the summary of what is in the image (as in the picture below).

Once you have found this number, you can email us at archives@nd.gov (this is the preferred method), call us at 701.328.2668, or bring or mail the order form to State Archives at 612 E Boulevard Ave, Bismarck, ND 58505. You can send these orders to my attention.

We require prepayment for photo orders, so don't be surprised if you must make your payment before you get to see the image.  Once your order and payment are received, we prepare your images. Typically, they are completed within two to three weeks, but this time can vary, and it may be more or less time to complete a photo order.

Using images from the State Historical Society

While you may obtain photos from us, neither copyright nor ownership is transferred to you. These photos remain part of our collection, and copyrights remain with the donor, publisher, author, or author's heirs. So we do have rules governing use of our collections.

1. Most, but not all, of our images are available for purchasing copies and for use.
2. Images must be used respectfully. They cannot be altered or rearranged in any way (although you can use a detail of a photo and mark it as such).
3. Personal use allows images to be used privately, for personal means, or for research. No use fees or forms are required for this use beyond the original scan fee.

Screenshot of Photo Collections page on history.nd.gov showing the image numbers

4. Public use means an image is used in a public area and/or potentially for profit, such as display in an office, store, restaurant, or similar building; publication in a book; or use in a documentary. This use requires patrons to fill out our one-time use form. Fees for this use are listed on our website.
5. Online use is allowed in specific ways. Images that may be posted online should be used in low resolution. If an image is posted on Facebook or a blog post or on a personal site, it must be cited as from the State Historical Society of North Dakota plus its photo number. Use fees are variable, but typically use fees are waived for online use. We may require users to fill out our one-time use form.
6. All images must be cited as being from our agency and show the full photo number. (State Historical Society of North Dakota 00001-00001 is an example citation.) This is for public use, but it is helpful to retain this number for people interested in obtaining an image for private use as well.
7. We do not allow State Archives images to be reproduced on clothing, or reproduced and sold in any other way.

Just remember, if there are ever any questions on photo use, we are here to help! Feel free to contact us at any time.

How to Search for Photos in the North Dakota State Archives

A photo is worth a thousand words, as the old saying goes. Photos can also be invaluable—especially for a researcher searching for old images of family members or historic images of places and events.

We receive many requests for photographs. We have a lot to choose from—the estimate is that our collection holds around two million photos (including glass plate negatives, prints, jpgs, tiffs, and all kinds of other materials). Not all of our images are scanned, however, and not all can be viewed on our website at this time. So how can you find an image you are searching for?

Right now, you can search in a multitude of ways. While it takes a bit of looking and a little extra work, it’s not nearly as difficult as it seems. And some of it can be done from home!

1. Digital Horizons. Digital Horizons is the easiest place to start for photo searches.

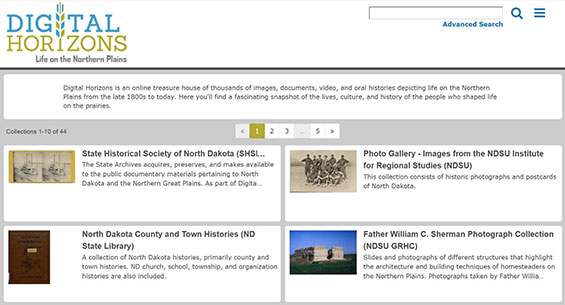
Screenshot of the Digital Horizons website homepage

This website is a conglomeration of select images from our collections, as well as other organizations around the state, such as the Institute for Regional Studies at NDSU, the Bismarck Public Library, the North Dakota State Library, and local county historical societies. Now, I did say “select.” Not all images from every institution in the state are available here. However, it’s a great place to begin any search. You can type in a keyword search in the search bar (see Advanced Search) and can even focus on specific collections. Images are here in low resolution, but you can see them, any information we may have on them, and also can find what institution they are from, as well as the photo number.

Digital Horizons page showing image information

Scrolling down on this page will show necessary information as to where this image came from. To order this image, you will need the Item Number and will want to request it from the correct repository institution.

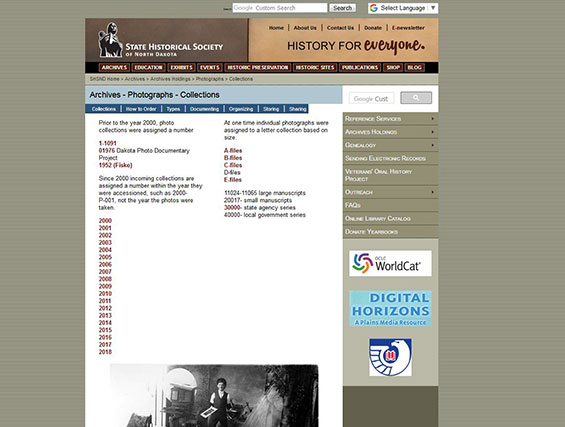
2. Photo indexes listed on our website. If you just want to know what sort of images might be available, this is a good place to start as well. You will likely not find the actual photo to look at, but most of our images are indexed and described somewhere on our website. While photo collections can exist in manuscripts and state series, and are not listed within this site, the bulk of our photos can be found in their own collections. View this at history.nd.gov/archives/photocollections.

Archives photo collections page on history.nd.gov

3. Keyword searches on our website. As I noted, not all of our photos are found in photo collections. Some are listed under the finding aids of other collections. So it is indeed worth doing a keyword search throughout our website. The best ways to do this are twofold.

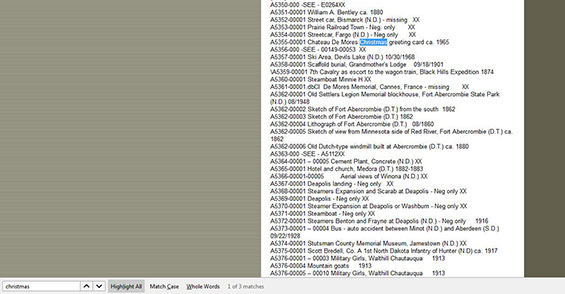
  1. In conjunction with searching a specific page (“control-f” on your keyboard will typically pop up the search box, and then highlight whatever string of words you are interested in).

    List of photos in archives collection
     
  2. Do a keyword search across the website. You can type in keyword searches and do an in-site google search for topics. Go to history.nd.gov/archives and you will see two search bars. While you can use both, to search just the Archives collections, you will want to use the one on the lower right side for your search.

    Showing the Archives search box on history.nd.gov

4. Search at the Archives. We do have a few other sources in the Archives that you can search. We have some paper files and some scanned jpgs that may not be available on Digital Horizons, but can only be viewed on a computer in our State Archives Reading Room. We also can help you with use our new database, Re:discovery, which allows staff to search for inter-agency topics. Eventually, Re:discovery will be accessible to the public as a search tool and will change how photos can be searched.

For now, these are your best options.

However, even when you are searching with these methods, there are a few things to keep in mind.

  1. Be succinct, and try a few key words. Being too specific (E.g., “President Theodore Roosevelt visiting North Dakota in 1902”) with your query in any of these searches will limit your results. Too general (E.g., “north dakota”) will bring in too many results. Find a happy medium. (E.g., search “Roosevelt,” “Teddy,” “President visit,” and “Roosevelt visit”).
  2. You can’t always see everything right away. Typically if an image is not yet scanned, I can send a small number of low-res thumbnails to individuals seeking photos, so they can see them before they order. Please remember to allow extra days for this service, as this does take time!
  3. Keep the photo number on hand for ordering. The photo number is how we identify and communicate about photos. It is listed on our website, on Digital Horizons, and on the photo itself. We need this information for research and orders.

I hope this helps you find the photos of your dreams! Look for my next post to see how you can use this information to order photograph scans. You will learn how these images can be used, what we expect, what we do and don’t allow, and how to place an order.

Book Repair: A Gateway to Feeling Accomplished

Where do you go if you have need of book repair? Since we are an archives, and we are known for having books (North Dakota related, of course), patrons ask us this question quite frequently.

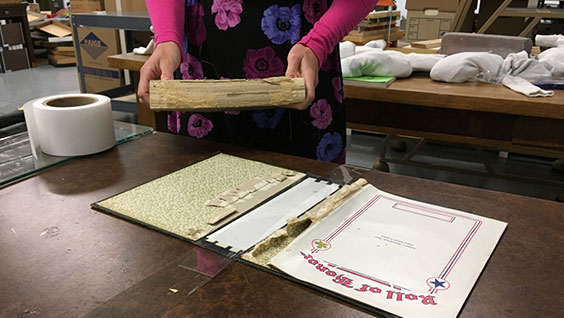
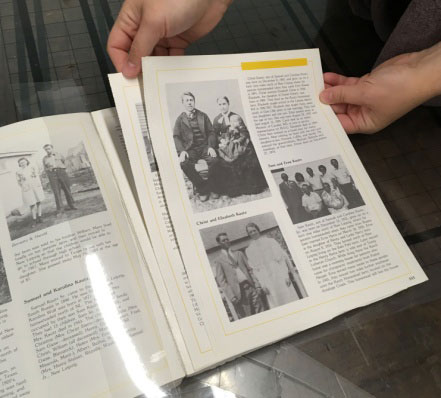
Repairing a book

Reference Specialist Sarah Walker holds a book mid-repair process. The original binding has been removed and strengthened for when the book block will be reattached.

Although we do not repair books here at the State Archives as a service for our patrons, we do actually conduct limited in-house book repairs for some of our most heavily used and damaged books to extend their shelf life (literary pun intended!). These are patch and repair, triage-style fixes, leaving behind scars. We keep the repairs as archival quality as we can (when using tape, glue, paper, and cardboard), but this is not restoration. This is survival.

However, it can also be super fun!

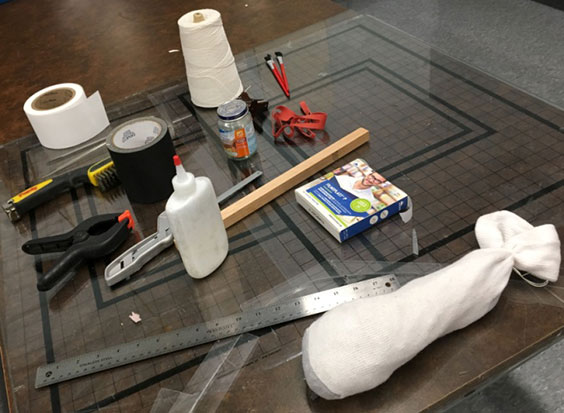
Book repair tools

Some tools of the trade are pictured here. Rubber bands; metal brushes; saws; glue; archival-quality, double-sided tape; clamps; string; paint brushes; a ruler; and a sock (used as a weight—it is filled with lead pellets) are all used in some capacity in our “workshop.” The white roll is a material called cambric, used to cover the spine and glue the book block back into the binding. We put small amounts of glue into baby food jars so we don’t have to leave larger bottles open, and then we apply glue with paintbrushes.

I learned some simple book-binding tricks and tips many years ago (or, what feels like it, anyway) from a gentleman who volunteered to teach our staff. There were several of us at the outset. Now, I am the only remaining staff member working on our books from this first instruction. However, our staff has kept the process going by working with each other and sharing the information.

Virginia Bjorness, cataloger, and Stephanie Baltzer Kom, head of technical services, are my book-binding buddies these days. We meet approximately once a month for about an hour and go through the tattered vessels that have been pulled from any of our various shelves.

We complete several steps to determine what is to be done, as not all books must be repaired equally.

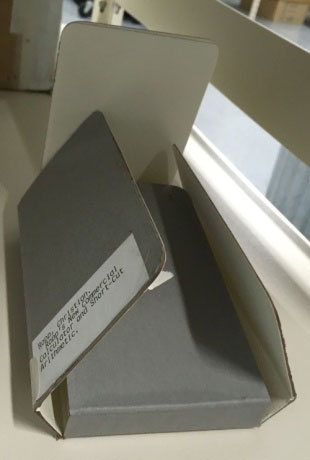
Phase box

This is a phase box. Made of a stiff cardboard, it protects everything inside of it by acting as a hard shell.

First, we determine whether the book should be put into a phase box instead of going through repairs. Using a phase box will protect the book as is. There are merits to this; it will maintain some historical integrity of the object (if this is important to the book). Also, sometimes the paper is too fragile to work with, or the repairs necessary are too numerous and would not improve ease in using the book. These books need a phase box and will be set aside for that purpose.

Once the book has been determined as free-for-repair, one of us examines it. What issues does it have? Are the pages merely falling out? Is the binding tearing? Is the book pulling in half? All of these are typical problems we see quite frequently in books of every age.

Then we look at the book to see what style it is. Does it have a flat binding? Are the pages glued directly to the binding?

Book with pages falling out

Head of Technical Services Stephanie Baltzer Kom displays a book with loose pages falling out.

Now it is time to fix it. Some fixes are pretty simple. For example, if a book’s pages are falling out, but the rest of the binding is fine, typically all we need to do is tip, or glue, the pages in. We apply a thin strip of glue on the binding-side edge of the page that has fallen out, as well as the following page, and then put the glue together, keeping the page as even with the rest of the book block as possible. We sometimes put strips of plastic between pages to keep them from getting glued to everything—glue is essential!

Some fixes are more time-consuming and involved. These tend to be my favorite. They frequently involve stripping the book block from the book and redoing the binding. This is more typical of books that have a rounded spine rather than a flat spine. Maybe the book block pulls out of the binding, ripping a page or two. In this instance, we might even have to apply a fix to the book block itself and tip a few pages back in, as well as work with the binding.

First, we must work with the book block. We pull the book block from the binding, put it between two bricks, and fully remove any excess materials of glue and fabric from the spine. We peel it by hand, cut it away, or even sand it. After this is done, we might be able to simply tip or glue the pages together, and then spread glue across the entire spine to make a glue binding to keep everything together. This is set aside.

Sometimes we have to restring the spine. This is my favorite part! After the book block is cleaned as best as we can, we use a small handheld saw to cut several shallow stripes into the spine of the book block. We add copious amounts of glue, again. Then we cut strings and squeeze them into those stripes. We clamp everything in place and tighten the strings. (I add more glue after this, just to be sure.) Then we let it dry. Voila! In the morning (or in the next month, when we are back together), it is just a matter of laying the block into the book, finishing up the edges, and gluing everything together.

If it is a flat spine and the binding is toast, we might use tape to recreate what was there. This is a special, much more hearty kind of tape (think duct tape in quality, leather-bound book in texture, and imagine “old library” to get the right color. Though to be honest, we mainly just have it in black.) We measure the covers and the book block, place the covers on the either edge of the tape, and tape them back to the clean, dry book block.

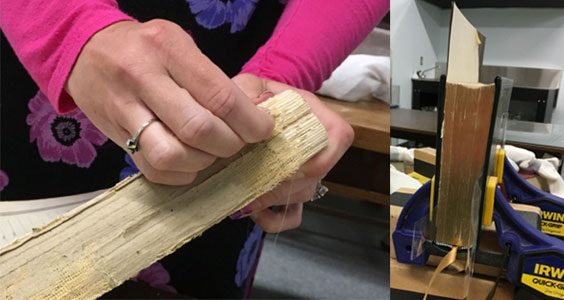
Fixing book

Left: Sarah Walker peels back fabric that must be removed before this book block can be put back into its cover.
Right: This book is clamped in place to dry. It had been torn from its binding but will soon be in one piece again.

Book repair is subjective, so we often confer with each other on these more difficult books. Sometimes we try something to see if it will work—and sometimes, we see these books return to us for more repairs. Quite frankly, we sometimes accidentally glue the pages in the wrong section, upside down, or to each other. Book repair can be complicated.

It’s also, in my opinion, a creative outlet, a stress release (especially when you get to use the saw on the book), and it is useful for maintaining readable books that our researchers can access and use.

So, to come full circle, where do patrons take their books for repair? We can brainstorm a few ideas for the patron who might prefer to send their books to a professional. However, although what we do is not preservation, and isn’t always pretty, it really does help the book survive. If any patrons would like to try their hand at repairing their own books, we are happy to provide some helpful tips. Feel free to contact us at archives@nd.gov!