Backstage Pass to North Dakota History

This blog takes you behind the scenes of the State Historical Society of North Dakota. Get a glimpse at a day-in-the-life of the staff, volunteers, and partners who make it all possible. Discover what it takes to preserve North Dakota's natural and cultural history.

“PrehiStories”: How My Mosasaur Rhymes Inspired a Children’s Book

We have a family poem—yes, you read that right. When I was itty-bitty, my dad would come in to wake me up, chiming a poem. (I just learned this poem was a somewhat altered version of Robert Louis Stevenson’s “Time to Rise.”) Dad’s take went like this:

Birdie with a yellow bill,
Hopped upon my window sill,
Cocked his shining little head,
“Get up you sleepy head!”

Over the years, my family added new and different verses to the poem, depending on the situation. For instance, during one winter cold snap, where many days fell below zero degrees, it went like this:

Birdie with a yellow bill,
Frozen to my window sill,
Can’t cock his shining little head,
Oh my gosh, I think he’s dead!

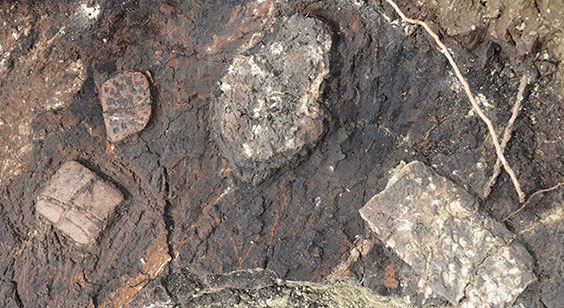
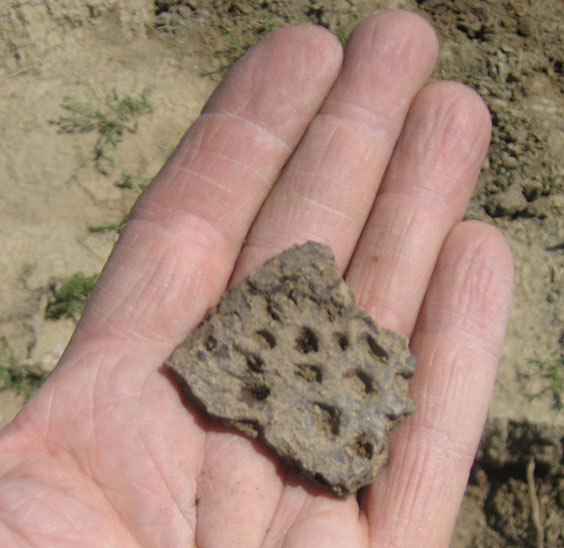
Thus rhyming, verse, and alliteration were very important methods of communication in my family—and the habit has stuck with me over the years. During the summer of 2018, while conducting the Pembina Gorge Fossil Dig, inspiration struck. We had been excavating a partial skeleton of a mosasaur (a type of marine reptile you can view on display at the North Dakota Heritage Center & State Museum) and were taking a dinner break. Sitting around the table with friends and colleagues, I began coming up with mosasaur rhymes. I struck on a fun rhythm—a couplet with 10 beats per measure.

Sit all around, and I’ll tell you a tale:
Meet our friend Mosasaur, big as a whale!

Well, that was a fun intro! I wondered how much I could write about mosasaurs before running out of ideas and giving up? The evening stretched on, and I bounced ideas off of Clint Boyd, senior paleontologist with the North Dakota Geological Survey, and fossil preparator Trissa Ford, who were also on the dig with me. By the end, we had figured out most of a book filled with an array of mosasaur facts. The mosasaur was not a dinosaur. It lived in the water. Some were big; some were small. They had different diets, had live births, and breathed air. The list kept going, and it was fun to read, so my bosses with the North Dakota Geological Survey decided I should make a children’s book, illustrate it in a fun way, make it relatable to kids, and include a few extra fact bubbles to fill in some of the complex ideas.

A storyboard with 15 boxes and sketches in 11 of them. The sketches go through a mososaur story.

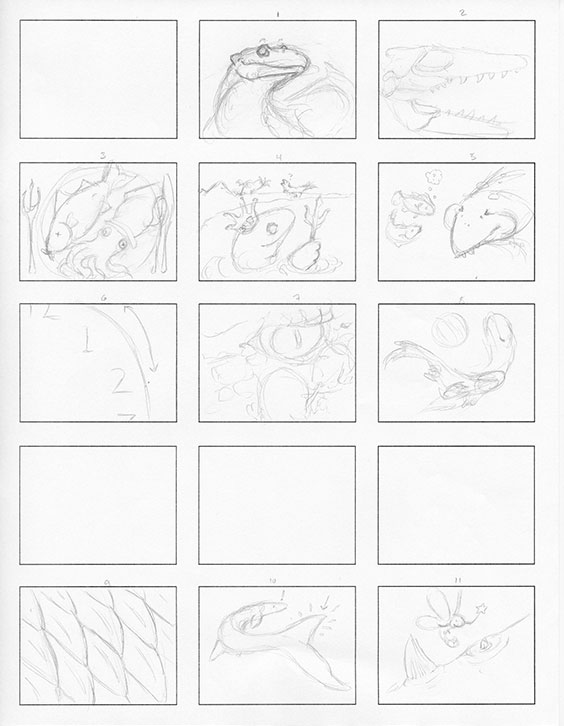
This is the start of my storyboard layout, where I played around with design and action.

Storyboard of four sketches. The first is the head of a lizard looking creature. The second is a plate with a fish and squid on it. Silverware sit around the plate. The third is the skull of a mososaur. The forth is a mososaur wearing a crown and holding a trident while he he peeks out of the water with some mountains and palm trees in the background.

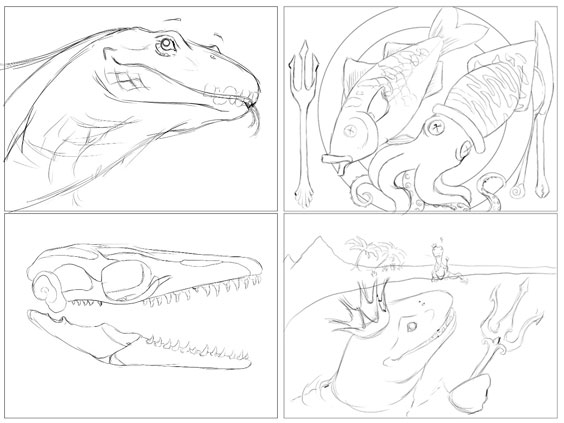
These are more refined storyboard sketches, before inking and watercolors have been added.

Four storyboard drawings showing the progression of finalizing a drawing from less detailed to finished piece. The drawing is of a white plate with a light green colored fish and a pink and purple squid on it and gold silverware around the plate.

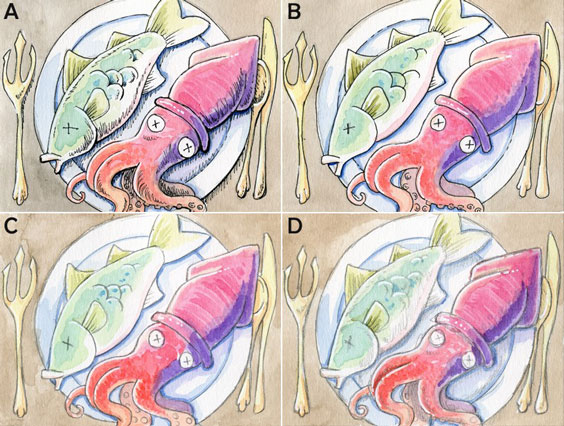
Before the storyboard got too far, I needed to figure out the feel for the book. I took a page I knew I wanted to use, drew it up four times, and experimented with pencils, ink, shading, and color.

After sketching some test runs, I settled on an ink-and-watercolor style. Not too much detail, but not too little either. All were done with bright colors. The next few weeks were spent painting, painting, painting! My storyboard was printed and taped to my desk—as I finished one page, the storyboard would get a nice big X over the image. It was very satisfying to see the to-do list shrink and the ready-to-scan pile grow.

Painting of an underwater scene where a blue and white creature is eating a green colored fish and a green and white creature is eating a pink and tan squid. Only the heads of the creatures are shown.

A fully painted page.

Once everything was painted and scanned, I had to put the images, text, and facts together in the computer. To be honest, this fiddling, placing, and tweaking probably took more time than the writing and painting. However, I am pleased with the result. Coming up with a title for the project was also fun. Since it’s a prehistoric setting about a mosasaur, and  “-storic” sounds pretty close to “story,” what if we made it a “PrehiStory”? But wait! What if we make up other stories in the future? Then it could be: “PrehiStories”!

Painting of an underwater scene where a green fish and a blue fish are looking at a large purple and blue creature with puffed out cheeks. Text on the painitng reads Fish come with gills to breath underwater, A mosasaur lung breathes air like an otter.

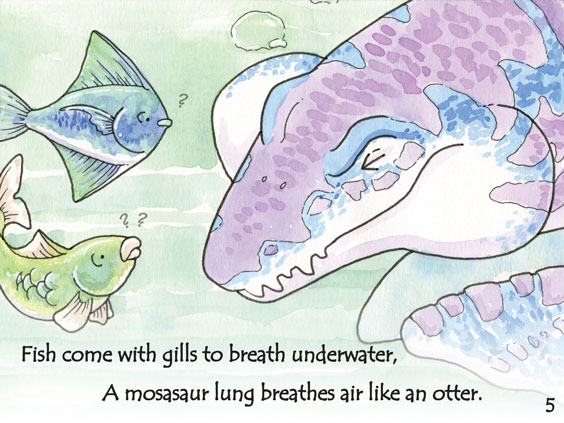
And finally, here is the painted page with text overlay.

Thus was born, “PrehiStories: Mosasaur.” If you’d like to pick up your own copy, they’re available at the North Dakota Heritage Center & State Museum gift shop.

*  *  *

Here is a bonus bird verse from my childhood. My dad had gone boating, and while hopping out of the craft, injured his arm quite badly, which inspired the following rhyme:

Birdie with a yellow beak,
Caught his wing upon a cleat
Turned his head to take a peek,
“Oh my gosh I’ve sprung a leak!”

Online Paleontology Chats

*static* Good morning, everyone. We're reporting from our home office during this time of uncertainty! This is about as behind-the-scenes as we can get right now. Each day while schools are closed, paleontology is putting together a livestream question-and-answer session for kids and families stuck at home.

What does this include? First, we pick a topic that we think is cool, and that we believe will be entertaining for kids at home. Our first three topics were mosasaurs (sea monsters), coprolites (fossil poo), and ammonites (ancient shelled squid relatives). From the responses we've had thus far, it's going over well!

Second, we do a personal refresher course on the topic—any new articles published, myths debunked, unusual facts, modern examples— to bring it together and make sure our information is as up-to-date as possible.

Third, we set up a streaming service (we're using Zoom) on a laptop, add in a webcam, and find a cool backdrop. I like to use the shelves in my office, because they're filled with odds and ends skulls, fossils, bones, toys, etc. With each session, I add or remove objects from the shelves. This gives a little something extra for kids to look for, and they spot the differences FAST.

Finally, we do the presentation! We're recording each session so it can be spliced later and added online, thus removing any potential extra voices, long pauses (thankfully few and far between), or when a young viewer decides they're bored and screen-shares Minecraft with us (oops!).

Screenshot of editing software

Editing the "ammonite" chat. You can see all the splices at the bottom where we take out long pauses or other undesirable segments to make the final video more streamlined and understandable.

We'll keep coming up with chats and streaming for as long as we can. All the paleo staff have kids at home too, so we understand the need to keep our “littles” educated and entertained. Our hopes are that these brief periods of science will help fill that niche.

This is Becky, signing off. Stay safe, wash your hands, and take care! *static*


To watch the chats live, go to our events page and click on tomorrow's event. There is a link in the description to the live feed. You need to sign up for a free Zoom account if you don't have one.

How I Became the Human Gyroscope

If you ever catch me walking up and down the halls while shaking, twisting, turning, or just generally moving around an object in my hands — congratulations, you’ve met paleontology’s human gyroscope! Paleontology doesn’t own an actual gyroscope — a spinning device that can be rotated many different directions — so we resort to human hands instead. What would this be used for?

When making a casting, a gyroscope can be used to save material by making that casting hollow. Rather than filling up a mold with plastic (a waste of expensive materials), just the outer wall of the mold can be coated. This also gives us the added bonus of being able to measure out weights (steel pellets) to add to the plastic to achieve the weight of the original object. If weights are added, then it is extremely important to keep that gyroscopic motion going, or else you end up with a weeble-wobble object that’s heavy on one end (because all the weight sinks down while the plastic hardens).

Becky holdling two small bottles and smiling at the camera

Becky mixing glue. Mixing mixing mixing!

Here I am mixing up a batch of glue (butvar-76 plastic dissolved in acetone). You can see the fume hood (window) behind me to make sure all the potential chemical fumes go far, far away. Mixing up a thin version (consolidant) is easy — just pour into our magnetic mixer and away we go! Mixing glue, however, is tricky, and aerobic. You have to KEEP MOVING the bottles for a good hour, or else the not-quite-dissolved plastic sinks down to the bottom of the bottle and sits as an immoveable clump. Then, the next time someone tries to squeeze glue from the jug, they get a squirt of very liquid acetone — while all the glue stays in the bottle.

Some of our behind-the-scenes work is glamorous. Fossils! Prep work! Artwork! Other times, my work is just the necessary tasks that have to happen to make sure those glamorous projects keep going.

Dinosaur Diseases, Injuries, and Pathologies

Some of the most fascinating features to observe in vertebrate fossils are pathologies. These are injuries or diseases the animal sustained over its life that left a legacy on the bones we collect. We like to think about these great, extinct beasts dominating the landscape — but what about the sick? The old? The injured? What happened to them? Living things in the past are just like living things today, each vulnerable to its own set of typical injuries. For the examples I provide below, I will be using Edmontosaurus, the duck-billed dinosaur (which also happens to be the same type of animal as Dakota the Dinomummy!).

Over the course of excavating these wondrous, giant “Cretaceous cows,” you would notice patterns in many of the bones. You would come across the standard bones and become more familiar with them, and thus would learn what they should look like as you gently scrape off the dirt . . . but the bones don’t always look the way they should. One of the most common bones to sustain injury is the tail — specifically what is called the spinous process. These long spikes sticking out of the centrum (main body) of the vertebrae are the same bumps you can feel on the back of your neck — just on the tail in this case. Interestingly, a lot of these tail injuries started healing before the animal died. Evidence of this healing includes breaks with a large callus (massive growth) of spongy bone around the breaks to stabilize fractures, or pockets and holes that were draining pus. The oldest animals even show evidence of arthritis on the ends of the spinous processes. Vertebrae also had a high chance of getting stepped on, perhaps while the animals slept in their large herds.

spinous process

This spinous process shows just a touch of what could be arthritis, but gives you a good idea of what one of these tail bones would look like.

broken spinous process

This broken spinous process is a mass of rough bone growth that had an active infection in it. The arrow is pointing to a lesion that was most likely an exit for pus.

two tail bones fused together

Damage happened during life to this tail, with the healed result being a fusion of two tail bones together.

trio of caudal (tail) vertebrae

This trio of caudal (tail) vertebrae (not from the same animal) all show breaks on the top-most portion of their spinous processes. The zoomed-in spine at right shows a different angle of the break, with the bone offset while healing.

caudal (tail) vertebrae with crushing damage

Series of caudal vertebrae with crushing damage. Vertebra C had nearly healed from a horizontal break that split the bone in two. Vertebra D was not as far along in the healing process. Vertebrae E and F split vertically in half and were riddled with infection. Pus-draining lesions can be seen scattered throughout the bone.

odd looking caudal (tail) vertebrae

This caudal vertebra is odd — it has lost the prezygopophyses [G] that connect the bone to the one in front of it, yet the area of bone has healed. The back end of the bone also shows damage, with another lesion.

spinous process

This spinous process is one of my personal favorites — just LOOK at that gnarly arthritis and infection! Crazy! AND a break on top of that.

The tail wasn’t the only bit of the animal to sustain injury. At the fossil site these came from, hand injuries were more common than foot injuries — at least you can run with a sore hand. But you become a Tyrannosaurus snack with a sore foot. Below are two hand bones that show damage. Both are set next to a normal, undamaged bone for comparison.

hand bone

This hand bone shows some possible arthritis in what would have been the pinky finger.

hand bone with pucker on one end

This hand bone shows an interesting pucker on one end, which slowed the growth of the bone. It is much shorter than it should have been.

Dakota the Dinomummy Makeover

Some of you may be noticing that the “Dakota the Dinomummy” exhibit at the State Museum looks a little . . . different. Don’t worry! Nothing is wrong, we are just in the initial phase of producing a new exhibit for everyone to enjoy. Since Dakota is quite the rarity (one of about six hadrosaur mummies in the world), and because it’s large and difficult to understand what the fossil contains, we decided it was time for a makeover.

Over the next number of months, parts of the current display will be removed for continued preparation and study. The first pieces to go are the arm, one foot, the tip of the tail, and the tail itself. What we call the “body block” will remain on exhibit for a while yet. The pieces that have been removed still have matrix (the unprepared rock) attached, which needs to be carefully chiseled off. The dinomummy as it sits now has had five years of preparation completed. Five . . . years . . . of people sitting around the blocks with pneumatic chisels and magnifying lenses, carefully removing the matrix grain by grain. After five years, there’s still a lot of work that can be done!

When a large fossil is removed from the ground, we have to flip it over to cover the bottom-side of the plaster “jacket.” To avoid damage to the fossil, this usually means that the bottom-side of the fossil is opened and prepared first. This works well, because the bottom of the fossil has had less exposure to destructive elements (wind, rain, snow, cows, etc.). So if only one side of the fossil will be prepared, in this case due to the size, weight, and fragile nature of the specimen — then the bottom is the way to go. The tail will be prepared this way.

Fossilized hadrosaur skin showing small scales

Skin found near the elbow of the dinomummy, with small scales and wrinkles to accommodate movement.

Other portions, such as the arm, are small and stable enough to prepare in-the-round. As you can see in the photos, the scales are vastly different depending on where you look. Toward the elbow, where the skin would stretch and move, the scales are very small, with wrinkles to accommodate movement — much like your elbows (sans scales, of course). The larger scales are found on the back of the arm and are relatively smooth. This would represent the mid-forearm on people, between the wrist and the elbow — an area with no movement.

Fossilized hadrosaur skin showing large scales

Skin found mid-forearm on the dinomummy, with fingernail-sized scales. This is an area between joints, without movement.

If you would like to follow along with the continued preparation of the tail, foot, and arm, we will have periodic updates on Facebook, Twitter, and Instagram (@NDGSPaleo, @ndmuseum). We have to remove as much matrix as soon as possible so we can have the tail 3D scanned. Our goal is to have a 3D-printed, touchable tail for visitors to interact with. The real thing will still be behind glass, but this way the public can truly pet a dinosaur.

Osteoderm Fossils: More than Skin Deep

For most people, the first things they think about when they hear the word “fossil” are bones from some ancient creature. Considering the hard parts of animals fossilize more easily than the soft parts, they have good reason to think so. But did you know that skin can fossilize as well? It is rare, but with the right set of circumstances (the animal is buried quickly, and dries out), paleontologists can find patches of skin. Sometimes, like in the case of Dakota the Dinomummy (an Edmontosaurus on display in the ND Heritage Center & State Museum), paleontologists can find a LOT of skin.

Today, I’d like to write talk about something in between. It’s not a skeleton, but it is bone. And it’s not skin, but it helps shape and support the skin. It’s something called an osteoderm — literally “bone skin.” An osteoderm is a deposit of bone material found within the dermis (skin) of some animals, generally covered by a thicker keratin sheath (the same material that makes up your hair or fingernails). The keratin covering is generally called a “scute.” Different animals have evolved osteoderms, from lizards and frogs to dinosaurs. Rather than focus on an obscure group of animals, however, I’d like to use crocodiles as an example, since most people can visualize them a little easier.

Crocodilian leather with osteoderms

I just *happen* to have some crocodilian leather with osteoderms in place.

If you can imagine crocodile skin (or if you can’t, just look at the image above), it is made up of many square scales. Osteoderms are located under the largest of these scales/scutes. Most of the time when crocodile or alligator skin is harvested for use in the clothing industry, those bony plates are removed in order to insure flexible leather, so people don’t really get the chance to feel the natural armor. The scute is left behind, giving us the look of a large scale, without the backing of bone.

Osteoderms are one of my favorite pieces to find on a fossil dig. They’re small, compact, look like Swiss cheese on the top, and clean up well. In 2013, as we wandered through a fossil site after a rainstorm, I let my eyes wander. As my gaze travelled down one of the now-dry rivulets, I saw six squares of white. Fossils, when they sit out in sunlight for a while, may change color or become bleached. I blinked. Sure enough — I was looking at six little osteoderms all in a row!

Erosional rivulet with osteoderms

Erosional rivulet containing osteoderms bleached white from the sunlight.

Bleached osteoderm

Close-up of bleached osteoderm.

Another site we visit on occasion called Whiskey Creek contains dozens to hundreds of osteoderms. Some are small, and others the size of a large belt buckle. If you’re ever out with us when we find these, you may hear us say “scute” instead of “osteoderm.” This isn’t a slip of the tongue; yes, we know that it’s technically an osteoderm. It’s just more fun (and faster) to say scute than osteoderm. Scute scute scute!

Osteoderm in situ

Osteoderms in situ at Whiskey Creek. The smooth side faces inward, and the Swiss cheese side faces the outside of the animal.

Holding a piece of osteoderm

Mid-sized osteoderm, with hand for scale.