Backstage Pass to North Dakota History

This blog takes you behind the scenes of the State Historical Society of North Dakota. Get a glimpse at a day-in-the-life of the staff, volunteers, and partners who make it all possible. Discover what it takes to preserve North Dakota's natural and cultural history.

Trimming Leaves the OLD Fashioned Way

Or is that fashionably trimming old leaves? When we (paleo) go out to collect fossils, generally what we bring back is not ready to be put on display. A lot of work goes into repairing, cleaning, and making the bits and pieces into something presentable. In this case, we collected blocks and blocks of fossil leaves on a soft sandstone matrix (the surrounding rock). The blocks were large, unwieldy, heavy, and UGLY. We needed to find the best method of trimming down the extra rock, while at the same time “leafing” the fossil intact for cleaning at a later date.

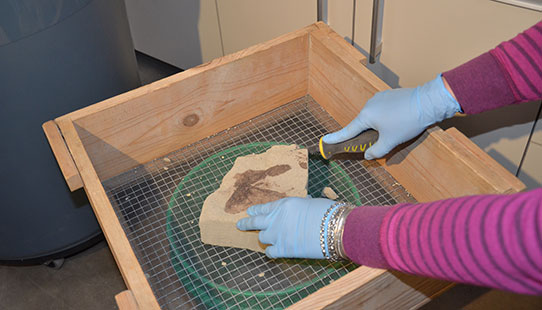
Thankfully, the sandstone matrix was soft and relatively easy to work with. Sadly, the sandstone matrix was soft, and crumbled easily! We ended up using keyhole saws to trim the sides of each fossil block – the rough teeth were much more useful in this case than the smaller-toothed hacksaw. The bottom was trimmed or flattened using a wire-mesh screen – essentially metal sandpaper for sandstone. Everything was balanced over buckets to catch most of the residual fine sand. Once carefully trimmed, butvar (plastic dissolved in acetone) was brushed onto the bottom and sides to help stabilize the sand. This left the top with the fossil leaf untouched, accessible, and ready to be properly cleaned later. In the end, we prepared a couple hundred leaves. It was quite the project, but it’s great to be able to have these fossils ready to share today and for generations to come!

Leaf-trimming setup

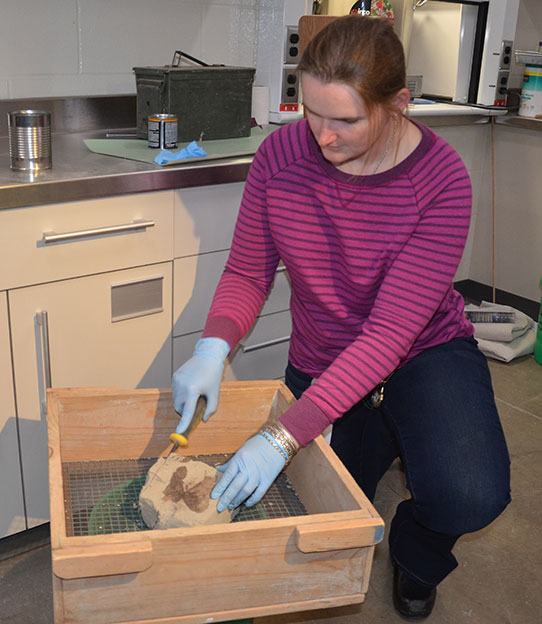
Becky with her leaf-trimming setup. Wire-mesh screen, keyhole saw (in hand), and a "Liriodendrites" leaf.

Liriodendrites leaf

Close-up of the "Liriodendrites" leaf

Mystery Monsters

What’s better than a 23-foot long mosasaur? A 40-foot long mosasaur! If you’ve walked through Underwater World in the Adaptation Gallery: Geologic Time, I’m sure you’ve looked up to see the giant swimming reptile called Plioplatecarpus. If you haven’t, you’re missing out. Imagine a monstrous komodo dragon with flippers, prowling the oceans as Tyrannosaurus stalked the land. The hanging Plioplatecarpus, a type of mosasaur, measures approximately 23 feet, nose to tail. That’s an impressively sized beastie. We’re currently working on another mosasaur in the lab – this one is most likely double the size of the one on display. Also found in the northeastern corner of the state, the monster mosasaur downstairs will take a long time to prepare (clean and restore). There are teeth, a few ribs, a bunch of thoracic and lumbar vertebrae – but not a lot of skull or flipper bones. They might still be hiding away in the unprepared jackets (how we transport them from field to the lab), but what we do have is of an impressive scale. Sadly, so are the concretions surrounding the bones – hence why it will take so long to prepare the fossils. To give you an example: one average-sized vertebra from the white mosasaur in the Underwater World seafloor (under the Archelon turtle) took maybe a couple of hours to prepare. One average-sized vertebra from our monster mosasaur can take up to 12 hours for one bone! Ufda.

Vertebra comparison

Left, vertebra from Plioplatecarpus. Right, vertebra from our unknown mosasaur.

Tooth comparison

Left: Tooth and root from the mystery monster.
Right: Tooth and root from Plioplatecarpus.

Fossils may be rock, but the work is delicate. The loose shale that covers everything needs to be scraped off so we can see what we’re dealing with. Airscribes (mini hand-held air-powered jackhammers) are used under magnification. The concretions are tightly adhered to the surface of the bone, but it takes a light touch to remove them. Push too hard with the airscribe, and you drill right into the bone itself. Afterwards the bone is taken to the microblaster (sounds fun, right?), which is like a sand-blaster, but shoots baking soda. When used properly, this can remove the little bits of dust and debris that remain. Used improperly, and you can blast holes in the bone. Thus, the number one rule in the lab is Patience.

I’m sure you’ve noticed the color differences between the bones above – and below you’ll see an even more drastic color change. This is due to the types of minerals that were around when the bones fossilized Our mystery mosasaur is rich in iron – so it’s a rusty, chocolate brown (and really heavy). The Plioplatecarpus is also iron rich, but also contains sulfur, which is why you can see yellow bits (and it smells like rotten eggs when you work on them). Below are bones from yet another mystery mosasaur from the Pembina region – this one is white and flakey (and super soft) from high concentrations of gypsum.

Vertebra and flipper bones of mosasaur

Vertebra and flipper bones from the Pembina area, on display in the Underwater World sea floor.

Comparative Collections – Using the Present to Understand the Past

Sometimes the best way to understand a fossil is to go fishing. A number of our paleontological sites across North Dakota have fossil bones from the family Lepisosteidae (gar or garpike) preserved. While gar are still alive today, their range tends to be more southern and eastern, closer to warmer, slow-moving waters and bayous. While the living gar may not be an exact match to our fossil gar, studying the bones from the living animals can help us better understand what we’re finding in the rock.

Our paleontology department has a small comparative collection of recent animals - things that may share similarities to fossil creatures we find. For instance, a modern deer may have similar bone structures to 30 million- year-old deer. A modern crocodile may have ribs and vertebrae that look similar to crocodiles that once roamed North Dakota 60 million years ago. The same goes for the gar.

This is where taxidermy comes into play. Instead of stuffing the skins of animals, we only keep the bones (similar to a European mount). To remove the flesh from the bones, dermestid beetles work wonderfully, but tend to smell, and can have the occasional bug escape artist. We can’t risk that in a museum. Burying the bones in the ground and letting nature do all the work is also an option, but that takes a bit of time and also needs a location to bury the critter. So we stick to simmering the bones in a pot.

Simmering the bones in a pot

For mammal skulls, this is a piece of cake. All the bones of the skull are knit together by sutures – think a bone zipper – and tend to stay all locked in place. Fish skulls, including our lovely gar, have very smooth joints between the bones (called synarthroses) that in life do not move much. However once the skin and connective tissue begins to break down, the skull bones will fall apart.

Since the fossil bones we find are all disarticulated (no longer connected to one another), we need individual bones from modern fish – not a completely intact skull. What we had to do here was make sure the bones fell apart IN ORDER while cleaning them. We simmer them for a while, gently scrub, and then pull off a single bone. Repeat. The bones were placed in order off to the side to dry, where they will be ready to eventually photograph or draw for comparison.

Bones

Bones

Here we have an articulated skull with the dermopterotic bone highlighted in red. This lets us know where exactly in the skull the bone is.

Articulated skull with the dermopterotic bone highlighted in red

Next, we have an illustrated dermopterotic, from our recent gar stew. This helps us identify a single bone, if we ever come across a similar looking piece in the field.

Illustrated dermopterotic

“You Mean, We Already Had A 'Triceratops'?”

In the previous Corridor of Time exhibit, there was a 6 foot long skull that for the most part went unnoticed. How is that possible? I’m glad you asked! It shared a platform with two Dromaeosaurus, and sat about 4 feet off the ground. The jacket (the plaster & burlap surrounding the fossil) was placed flat into the surface. It was a view most people were unused to seeing such a large skull in, and so it was overlooked.

In the new Adaptation Gallery: Geologic Time, that problem has been solved. The skull now sits propped up, surrounded by rock, and extremely visible next to our full-size Triceratops skeleton cast. This is the story of how it got there.

When the original display was dismantled, we had two main goals. First we needed to do additional restoration of the skull. Second, we had to figure out how to better display it. In the time between the original skull restoration many years ago, and preparing for the new exhibit, our paleontology lab had acquired new tools for cleaning, one is called a microblaster. Think sandblaster, only using baking soda instead. Why baking soda? Well, if you look at the particles under a microscope, you will see they’re actually pointed and jagged – but not so abrasive as actual sand. Generally fossils we clean with the microblaster are placed in a blasting box with a filter hooked up to collect all the dust. The Triceratops skull was much too large, and too heavy, to fit inside even our largest blasting box. We had to create a makeshift shield that would collect the wayward dust, and not spread it everywhere… We succeeded, and removed the last bits of dirt (which we call matrix) from around the bone, exposing the beautiful natural chocolate color of the fossil.

The skull is so fragile and heavy, there isn’t a good way to remove it from its plaster jacket cradle. So, to display the fossil, we would have to include all the plaster and wood frame that supported it. Some of our display bases and forms were created by an exhibits company, including the metal frame that now hides below the skull, propping it up. We couldn’t just leave it like that however. Wanting to draw attention to the fossil, away from the support materials, we decided to build a fake rock wall around it. It needed to be light, yet durable, and still look like rock. This took a many-step process of measuring, creating a pattern, cutting the pieces out of foam, making sure they fit, then covering the whole thing with a sculpting epoxy. Adding difficulty to this process is the fact that the skull, now in its permanent home, was upstairs in the new gallery, and our fabrication area for building the wall was downstairs!

With the rock wall now painted and in place, the Triceratops skull looks like it is nestled in the rock outcrop it was originally excavated from.

Moving the "Triceratops" skull with a forklift – people at the ready to help hold it in place.

The skull is in place! This is why it needed a little faux-rock makeover.

The guts of the rock wall – insulation foam, sculpting epoxy, sand, and paint.

Nearly complete – just needs a dab of paint.

Fossil skull and rock wall (right) next to "Triceratops" skeleton cast (left).