Backstage Pass to North Dakota History

This blog takes you behind the scenes of the State Historical Society of North Dakota. Get a glimpse at a day-in-the-life of the staff, volunteers, and partners who make it all possible. Discover what it takes to preserve North Dakota's natural and cultural history.

Designing a Museum Mural to Save Space: How a Paleontologist and Artist is Creating a 3-D Plesiosaur Exhibit

In October 2016 I wrote a “Year of the Plesiosaur” blog that showcased a chain of vertebrae from the neck of one of these Loch Ness-esque sea monsters. In a perfect world we would show the awesome size of this creature by hanging an entire cast of the skeleton (all 50 feet of it) in the Underwater World exhibit of the State Museum’s Adaptation Gallery: Geologic Time. However, we do not have the kind of space needed to facilitate that. What about hanging part of the cast instead? Even a portion of the 70-vertebrae-long neck is impressive to behold. As you enter Underwater World, there is a blank wall to the right of the mosasaur on display. We decided to paint the rest of the plesiosaur on the wall and have the cast neck and skull sticking out as a three-dimensional element.

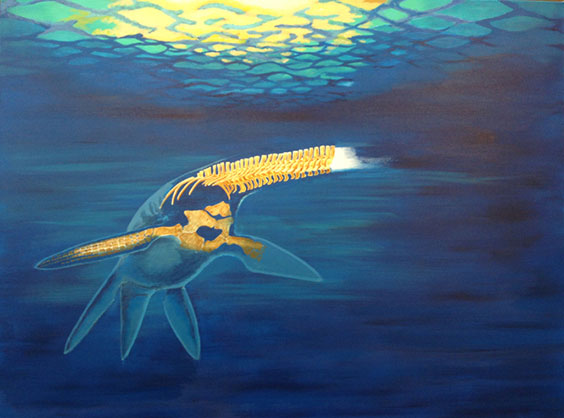
Then the question was: what to paint? Do we paint a fleshed out creature and have the bones sticking out of the wall? Seems disconnected. How about a skeleton painted, and the 3D bones? Seems a little gruesome. What about an x-ray effect, with a fleshed out creature and the bones (real and painted) fading into obscurity? Perfect! What is the process now?

Sketch of Plesiosaur mural

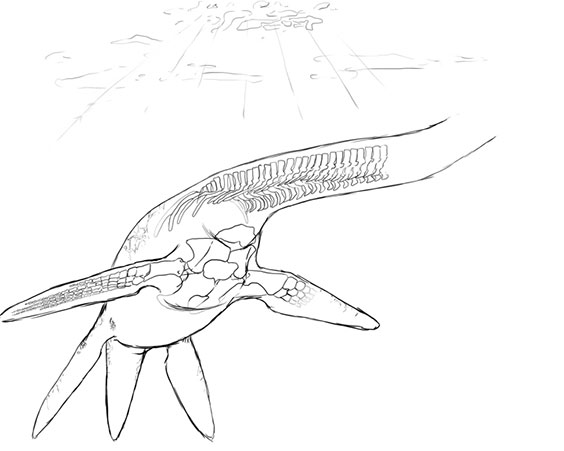
Initial sketch for the mural.

We measured the wall at 106” wide. Then we picked up a painting canvas at 40” wide. Since I’m the artist for this mural project, I can paint in the comfort of my office instead of pretending to be Michelangelo for weeks on end. The plesiosaur was drafted in a few different poses, until we found one that fit what we wanted. We needed an underbelly view, since the animal will be above the viewer. Take into account light sources, so there are not strange shadows. Next calculate how much the painting will need to be enlarged into a wall mural to fit the space (265%). Then check the size of the last cast vertebra – 9.5” tall. So, at 265%, the last painted vertebra needs to be 3.6” tall in order to fit the expanded painting.

Water painted on Plesiosaur mural

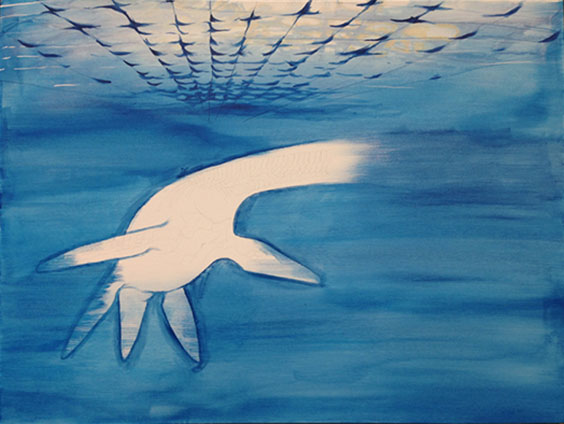
Washes of blue acrylic get rid of the white void, and actually make it easier for me to concentrate.

Now it is time to paint. Redraw the critter on the canvas and rough out my lighting and shadows. I like to do an underpainting of acrylic first to get rid of the blank white of the canvas. Nothing is worse than a big white canvas staring at you. Acrylic dries fast, which is good and bad. Good because I can get a lot of color on fast. Bad because I’m terrible at going back and blending with established (i.e. already dry) colors.

Some bones have been painted onto the Plesiosaur mural

After layers of acrylic, the painting is just about ready for oil paints.

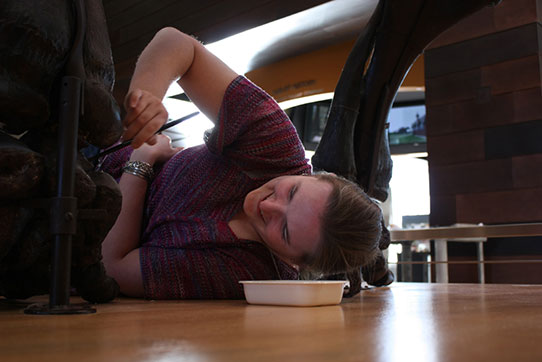
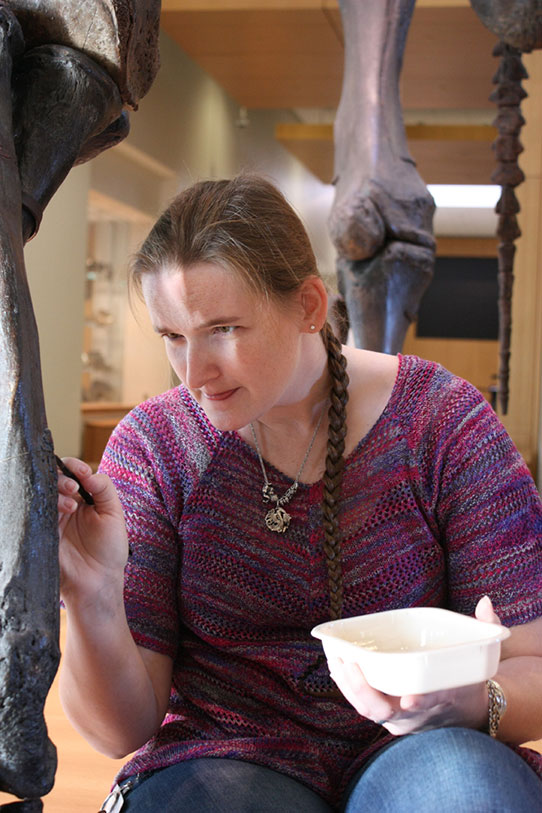
Once the underpainting is done, I start in with oil paints. Sadly I have an allergy to standard oils, but I’ve found a walnut-oil based paint that is low odor and is smooth like butter. The oils I can blend on palette, as well as on canvas. As of right now, the painting is almost done – I’m not going to show the final image, however, until our grand unveiling of the exhibit including the mural and cast neck and skull. So come by the museum on April 27 and you will be able to see the finished product!

The Art of Making Fossil Casts

A few blogs ago, I introduced the good kind of mold we have in paleontology: silicone rubber, used when making casts of fossils. Depending on the purpose of making a cast, the end result can look very different. If we need to make a cast to replace an original fossil, a lot of time and care are taken to paint the cast to make it look as close to the original as possible. If a cast is meant to be a teaching tool, handled frequently, or given away as a prize, then maybe a more generic paint job (i.e. less time) is used.

There are times when people are conflicted – they found a cool fossil, and they want to donate it to the State Fossil Collection, but they would also like to keep it to show their friends and family. Depending on the fossil, we can make a cast and paint it to match the original. This way the person can keep what looks (and even weighs) the same as the original, but the real one is safe in collections.

Mosasaur vertebra casts and original fossil

Two painted casts of a mosasaur vertebra, and the original. Which is which?

During our 2017 dig season, our public diggers came across two beautiful Tyrannosaurus teeth. Everyone wanted the teeth – yet there is only one of each. What to do? Make copies and paint as close to the original as possible. After making a silicone mold, it was time for an assembly line. There is no point to mixing up all the paint you need, over and over, to paint one tooth at a time. So we cast a bunch, mixed our paint, and started the lengthy process. In order to keep all the surface texture, the paint had to be applied in thin layers. Wash after wash. While it is nearly impossible to match a tooth exactly, we can get close enough. This means lots of small brushes, and patience.

One of the failings of casts is that they are often much lighter than their rock counterparts. To fix this we weighed the original tooth (171 grams). When mixing our plastic (~65 grams), we made up the difference in weight by adding metal BBs without adding a lot of volume.

T. rex teeth on scales

Original Tyrannosaurus tooth (left) and 80 percent painted cast (right). Weight distribution in both teeth is the same.

We can’t just let the plastic and BBs sit in the mold, or all of the weight would be on one side. So, we have to rotate the mold until our plastic sets. Time consuming? Yes. Great arm workout? Yes. Awesome teeth? Totally.

Becky turning box

Becky becoming the human gyroscope. Turn, turn, rotate, pivot.

Mastodon Repair

Museum staff often have to walk a fine line when it comes to displays. Sometimes we get it right, and other times a little modification may be needed. If barriers are put up (such as Plexiglass, metal railings, etc.), some people feel offended or think that we’re trying to keep them away from the object on display. However, if we have no barriers, sometimes people get a little…too…up close with the artifact or specimen.

One of our first priorities is to keep the object on display safe. Without them, there is no museum! A gallery filled with photographs of fossils isn’t the same as seeing the real thing. Safe for the fossil? Yes. Good for museum patrons? Not so much. Another priority is to keep our museum visitors safe. For the most part in this state, we see a good dose of “North Dakota Nice,” which helps us keep our barriers to a minimum and objects close for viewing. There is the occasional mishap however.

Mastodon repair wrapped up with bandaid sticker on it

Plastic shrink-wrap and a touch of humor to hold the bones in place while the glue dries.

Someone trips over untied shoelaces, and bumps into a painting. Perhaps you wish to show everyone where you are, and during a selfie opportunity lean too far back, knocking into a display case. Or maybe an over-exuberant child who has escaped the watchful eye of parents runs into the leg of a Mastodon.

Becky Barnes lying down to paint the mastodon repair.

Not all repairs are conveniently placed! Becky touching up some spots of plaster with brown paint.

This last case did happen. No one was hurt, but the Mastodon legs did suffer some…dislocation. So what happened then? We fixed it. After making sure the bone was still in good condition, we looked for what went wrong with the display mount and how to counter the problem in the future. The radius (lower arm bone) was previously only glued into place. To repair it the bone was first cleaned, then we re-glued the bone and added some wire support. The wire was painted brown to match the bone and make it less distracting than shiny silver. To give the bone a little extra support while the glue was drying, we added a temporary layer of shrink-wrap.

Becky painting the mastodon repair

Becky concentrating on painting the newly installed silver wire.

The physical railing around the Mastodon is very low, so it doesn’t distract from the skeleton itself. There’s not a whole lot of modification that can be done on that aspect. So – can people touch it? Even though the physical opportunity is there, the museum staff sincerely hopes you will use photo opportunities, rather than tactile ones. Help keep our museum safe – safe for you and safe for the specimens and artifacts – and enjoy North Dakota’s history!

Year of the Plesiosaur


In the Chinese calendar, this is the Year of the Monkey. If Paleontology had a calendar, it would be the Year of the Plesiosaur! Northeastern North Dakota is well known for its underwater fauna. Mosasaurs (giant marine reptiles) swam alongside Archelon (giant sea turtles), Hesperornis (flightless birds), as well as plenty of fish and squid. Another type of marine reptile lived here that many people identify with the Loch Ness Monster (Nessie) – a plesiosaur.

Cartoon plesiosaur and scupture of Loch Ness Monster

Right: Sculpture of the Loch Ness Monster

Brief science lesson: plesiosaurs are a group of marine reptiles that contain a number of divisions. One group, the Pliosauroidea, had large heads and short necks. The other group, Plesiosauroidea, in general had small heads and long necks. Prior to their descriptions in 1824, they were grouped together with other marine reptiles, and sometimes even fish. Since then many shapes and sizes have been found – but few from North Dakota.

As of 2015, the State Fossil Collection had two elasmosaurid (reaaaallly long neck) vertebrae. One is on display in the Adaptation Gallery: Geologic Time of the North Dakota Heritage Center, and the other is on display in Icelandic State Park. During the National Fossil Day event last October, a private citizen turned in another vertebra found south of Bismarck. In spring 2016, paleontologists Clint Boyd and Jeff Person made a road trip down to the Pioneer Trails Regional Museum in Bowman. Behold – more! Not just one vertebra, but 15 articulated neck bones, plus bits of a partial skeleton! Then, icing on the cake – During our Pembina Gorge dig, a local brought in some bones to have them identified – yet another plesiosaur vertebra, this time from the body. The creatures were coming out of the woodwork from all across the state – it was amazing.

Plesiosaur vertebrae

Vertebrae from the articulated neck of a plesiosaur. Fifteen were collected; one neck had around 70 vertebrae.

The next steps will be to fully prepare the material found, and then identify who it belongs to. Saying “plesiosaur” is like saying “dog.” It’s a general term that gets a basic body shape in mind (notice the lower-case letter and non-italics). What we want to know are the specifics. Saying “Elasmosaurus” or “Styxosaurus” would be like saying German Shepherd and Scottish Terrier – a narrower description (also uppercase first letter and italics).

It is important to note – plesiosaurs are not dinosaurs. They are marine reptiles. For example, if we take a dog (land mammal), and a dolphin (water mammal) – both are mammals, both can coexist, but they are not closely related. It is the same with a plesiosaur (water reptile), and a dinosaur (land reptile).

The Good Kind of Mold…

Mold in paleontology can mean two things. The first (bad kind) happens when you get water trapped in your field jackets (plastered specimens), it sits for ages, and grows a nice layer of Becky-breathing-impairing mold. The second (good kind) is when we need to make a copy of a fossil. Not just any copy, but an exact copy. This could be because a fossil is one-of-a-kind, and we need to show it to other researchers without fear of damaging the original. Or maybe it’s a really neat specimen we want to give away as a souvenir or include as a hands-on demonstration, allowing people to touch the copy.

A mold could be a simple one-sided “dump” mold, where only half of a fossil is copied. This is good for a display mount, perhaps a nice shelf specimen, or giveaways to kids. If the whole fossil is needed, we could need a two-, three-, five-, or even ten-sided mold (depending on the complexity of the fossil). No matter what size mold is created, we make sure the fossil can take the stress. Generally a very thin sealer is put on the fossil to make sure the silicone (our mold material of choice) doesn’t sneak into cracks. Then, we figure out where the pour spout will be and any vents. Anything projecting to the side above the spout or vents can trap air bubbles – so we make sure everything leads up and out. In metal casting, this is called your “sprue” system.

Walls keep the silicone in a mold while it sets. Some people use wood or clay – We use LEGOs! They can make any shape, the clay doesn’t stick to them, the silicone doesn’t stick to them, plaster doesn’t stick to them – they’re perfect to use and reuse. If you notice an odd brick pattern on the sides of all my molds, that’s why.

Sometimes part of the fossil being molded will be embedded in clay (sulfur-free, or my silicone won’t set). As the clay is sculpted around the fossil, I have to imagine it as future silicone. No undercuts or thin spots, or else the silicone will be very difficult to remove and put back together again. The initial silicone is poured on top of the clay/fossil combo and left to cure. Once cured, a mother-mold may be added – this is a stiff backing, which could be plaster or fiberglass to add support later. The mold is flipped over, the clay removed, and a release agent placed on the now-visible silicone we just let cure. Silicone likes to stick to itself, so we need to put a thin barrier in place. Vaseline works great and is inexpensive. We repeat the silicone/mother mold process on the other side, or sides, depending on how many pieces a mold needs to be. Ta da! After everything is cured, the fossil is removed, and the mold is ready to go!

Multi-fossil mold

Multi-fossil mold, to reduce the amount of LEGOs used. Clay backing is visible.

Clay backing removed

Clay backing has been removed, and the first pour (opposite side) of silicone can be seen surrounding the fossil. Clay pour-spout and vent (bottom) left in during the second silicone pour.

Silicone poured over fossils

A thin coat of silicone poured over fossils, and then a thicker coat. This helps to reduce any bubbles our vacuum chamber misses.

Small mother mold

A small mother mold consisting of plaster and cheesecloth helps add rigidity to the end mold. The LEGOs and fossil will be removed next, when the mold is split apart.

Gotta Dig ‘Em All

Another series of bones are being slowly added to the State Fossil collection. Concordia College in Moorhead, MN, held one of the largest collections of Edmontosaurus (“duck-billed” dinosaur – same kind of animal as “Dakota the Dinomummy”) bones in the country. Dr. Ron Nellermoe, who recently retired from a position of teaching biology and geology at the school, worked on a quarry of Edmontosaurus in South Dakota for over ten years. During that time, thousands of fossils were collected, many with beautiful preservation. This collection of fossils is where I got my start – my real start – in paleontology.

I had spent the last five years preparing Green River Formation fossil fish from Wyoming, so I wasn’t totally new to the time and patience needed for fossils. It was the spring of 1998; my grandmother had spotted an ad in the local paper about a “communiversity” course being offered on dinosaurs and fossils. I wanted to jump at the chance, but I had already watched one opportunity vanish. Two years prior, my aunt let me know about a dig in Wyoming – BUT – you had to be 15 to go. I waited a year, only to find out the dig had shut down. Now at 16, I wanted more than anything to go on this dig, but we weren’t sure if they would allow a high school student along.

My family contacted the school, and thus Dr. Nellermoe. He wasn’t thrilled about the idea of a 16-year-old girl going along. -Somehow they convinced him and assured him that an adult would accompany me on site. I was in! The spring was spent volunteering in the paleontology lab, learning how to clean and identify bones, and reading every paleontological reference book I could. Summer finally hit, and I dove into digging. I pulled my weight, probably asked way too many questions, kept a journal, and soaked up as much as I could. Meanwhile my Mom painted the local landscape.

Pages from Becky's first field journals

Pages from the first field journals Becky took at the Concordia Edmontosaurus quarry.

Fall hit – I was back volunteering in the lab. This kept up for the next two years until I finally could officially enroll at Concordia College. By this point, I transitioned my volunteering to work study and obtained one of my favorite job descriptions ever: bone technician.

Young Becky on site

Becky hiding from the summer sun. OR A young Becky on site. OR both.

After Concordia, I continued my schooling at NDSU, using the Edmontosaurus collection as the basis for my Master’s degree. Eventually graduating and moving to Bismarck, I had to wave a fond farewell to the collection and professors that played such a large part in getting me to where I was. Then a few years later – a phone call. The science buildings at Concordia were undergoing a massive renovation, and there would be no room for bones. Would the State Fossil collection in Bismarck make a good home?

Long story short, we’re in the process of transferring the collection – I get the chance to continue working with the bones that started me on my way.

Bones in storage at ND Heritage Center

Plastered and finished bones moved to the State Fossil collection so far.