Jesse Kaas, Collections Intern
In a museum collection as large as that of the State Historical Society of North Dakota, inventory is key. Inventory provides the collections manager and registrar with the information needed for insurance, security, conservation, and preservation needs.
There are three main types of inventories that take place in museums: complete, partial, and random sample inventories. A complete inventory is a total inventory of all the items in the collection. This type of inventory is only undertaken periodically due to the time and effort it requires. As a result, random sample and partial inventories are carried out in between full inventories.
Random sample inventories check a random selection of items in the collection to see if everything is in order. The results of this sample can then be inferred to the rest of the collection. Similarly, a partial inventory is an inventory that checks a specified number of items; however, these items are not random. Partial inventories can be done by rows or by specific types of objects. For example, an inventory may be taken of all the knives in the collection. A partial inventory concerning an object type or a specified row of shelves may be selected due to the infrequency of attention placed on the area or because a cataloging problem has been identified. All three types of inventories play a crucial role in keeping the collection up to date.
As an intern here at the North Dakota Heritage Center & State Museum, I have mainly dealt with inventory-related projects. The big project I am working on involves updating general inventory information on radios, phonographs, phonograph records, and other related items found in the collection. Updating general inventory information entails pulling each item off the shelf and adding or updating its description, condition report, dimensions, provenance, and location.
Early on in this process, I discovered some items were unnumbered and/or placed in the wrong location. This fact introduced a slight thrill to my inventory project. If an item on the shelf was unnumbered or not in the right place, I would try and pair it with the surrounding objects based on similar markings or model types, or I would look up the object by name in the computer database system and see if it had been misplaced. If I could still not find the number or place of the object, I would register the item as FIC or found in collection. This would kickstart the process of giving the item an official paper trail.
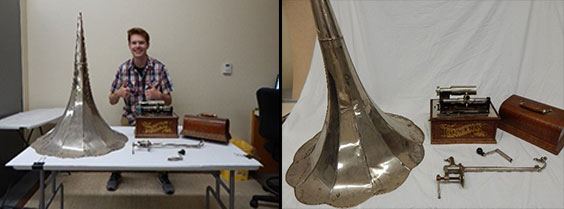
Reunited, and it feels so good! Here I am with a graphophone and related pieces that had been separated. SHSND 14666.4
One item that induced some excitement was a late 19th-century Columbia Graphophone. This graphophone, a later version of the first phonographs, was missing its hand crank, horn, and horn support. There was no paper trail that accompanied this item. I was able to identify the items associated with the object by going through a few cranks, horns, and horn supports in other locations. Needless to say, due to its immense size I did not find the horn in the same location as the graphophone. Nonetheless, after going through these items, I was able to match a hand crank, horn, and horn support with the graphophone by pairing similar labels found on each item. After I was confident that I had properly identified the graphophone set, I labeled the items and placed them at their proper location. Success!
 Jesse Kaas is a Collections Intern in the Audience Engagement and Museum Department. During his internship, Jesse has helped to inventory collections in storage, propose potential items for deaccession, and assist with other miscellaneous tasks. Jesse is pursuing a bachelor’s in history at the University of Mary.
Jennifer Ness, Collections Intern
During my internship at the North Dakota Heritage Center & State Museum, I am working on a small area of a larger inventory project in the museum collections. My area is Row 10, which contains household and musical objects. Right now, I am looking at kitchen items, like utensils, pans, and molds. My job is to make sure everything is in the right place with the correct information.
An item will always have a name, accession number, object number, and a few words of description. Whether an object has any extra information, such as a complete description, date, or condition, is a tossup. Some objects have been looked at recently and have an abundance of information, but others have only the bare minimum. In those cases, I need to write the description, fill out the condition report, determine dimensions, and check that all the information is correct. These items take the most time, so finding ones that only need quick fixes is refreshing. The most common fix I make is dealing with object names. In the database, objects are named for what the item is. A spoon is named a spoon. But if it is a serving spoon, then the label reads: “spoon, serving.” This allows an object to be identified as close as possible with its function.
Saucepans have become the bane of my existence. Before I inventory a shelf, I print out a list of what is on the shelf. And saucepans keep showing up. At first, I didn’t think too much of it because I am working with kitchen items. But when I would go to inventory a shelf, there would be no saucepans. Soon I discovered “saucepan” was apparently used as a universal term for any type of pan. A bread pan? Nope, it’s a saucepan. A frying pan? No, a saucepan. A cookie sheet? You guessed it—a saucepan! The one time I found an actual saucepan it was labeled as a kettle. Logic! With this new information, I am prepared to find anything when the word saucepan appears on a list. For example, a shelf I am currently inventorying says it had seven saucepans on it. Naturally, they are all bread pans.
In addition to my adventures with so-called saucepans, my internship has also introduced me to items in the collection that I have never previously seen. Once, I found an item identified in the database as a cake mold. In actuality, it appeared to be a chalice with a handle, but there were scrapers inside, and the bottom had a ring for turning the scrapers. This confused me, and the information in the database was not particularly helpful. Some dimensions were listed along with a description that noted the item was “possibly a cake mold.” I found a quarter-sized piece of metal on the front of the cup that had some faint markings on it. I was able to make out “PAT NOV 12 878.” After looking that up, I found the remaining markings and identified the object. The full markings read “CLEWELL’S V. CLAD MAKER,” and the object is an ice cream scoop. The strange scrapers inside were used to cleanly remove the ice cream after it was scooped. I found more about the maker and his company. William Clewell is said to have created the first ice cream scoop in 1878. The process of digging for information is really fun, and I’m glad I was able to find more out about this ice cream scoop and update the information in the database.
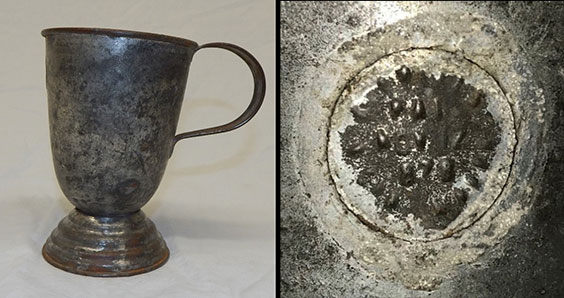
Ice cream scoop and close-up of the markings. SHSND 9692
 Jennifer Ness is a Collections Intern at the State Historical Society of North Dakota. She is from Mandan and is pursuing a bachelor’s in history from Minot State University.
Mary Johnson, Entomology Collections Intern
As the entomology collections intern this summer, my major project is to identify and catalog a large collection of pinned insects. This collection is a recent acquisition and was owned by a woman from Mandan named Mary Phillips Fors. It contains around 1,000 specimens mostly in order Lepidoptera, which includes moths and butterflies. Many of the specimens were collected in and/or are native to North Dakota, but there are some from all around the world! I was fortunate to be hired to work on this project because of my background coursework and special interest in entomology.
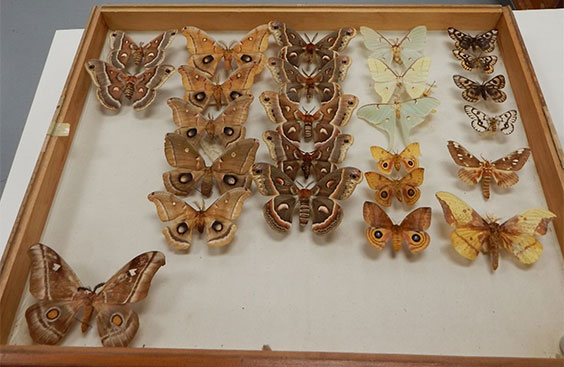
A drawer with some of the largest moths in the collection, family Saturniidae or giant silk moths. SHSND 2021.10.1-25
Typically, natural history and science museums house entomology collections for research purposes. Each individual specimen tells part of a species’ story—from genetic code and variations in physical features to population and range of the species over time. In a setting like the State Historical Society of North Dakota, the purpose becomes a little different. It is less about telling a story through scientific data and more about telling the story of North Dakota, including the wildlife that has historically lived here and the individual stories of people’s interactions with that wildlife.
Other than looking at the beautiful variety of species, my favorite part has been reading the pin labels. The pin labels are what hold some of that vital scientific data I mentioned previously. They tell when and where a specimen was collected along with who collected it. Over 15 individuals, sometimes only identified by their initials, contributed to this collection. Each pin label gives a snapshot into that person’s life, where they were on a specific date and how they spent their vacations and free time. For example, an entomologist and his wife spent many nights in the summers of 1974 and 1975 trapping moths all over the state. In fact, they went out trapping so often they had tiny pin labels printed up with both of their initials.
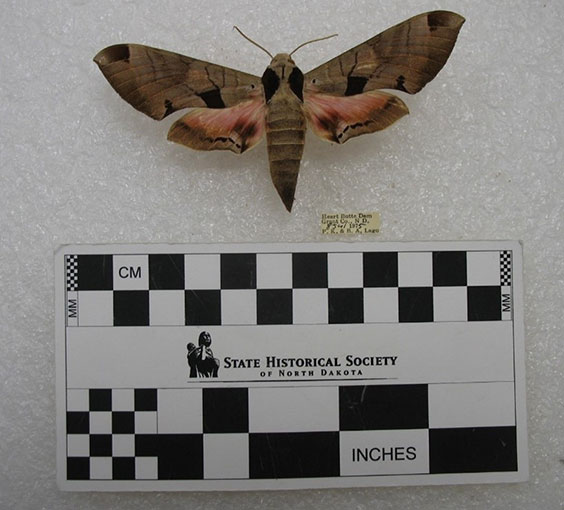
Eumorpha achemon or Achemon sphinx moth, a specimen collected in 1975 by Paul K. Lago and his wife, Barbara. SHSND 2021.10.178
Working with this collection has been fascinating. Not only does it show the amazing diversity of moths and butterflies native to North Dakota, but it also reveals aspects of the individuals who studied and interacted with them.
 Mary Johnson is the Entomology Collections Intern in the Audience Engagement & Museum Department. She has a background in biology and is working toward a master’s in Museum Studies with a focus on science museums from the Cooperstown Graduate Program at SUNY Oneonta.